≡ Menu

Coconut Roasted Sweet Potatoes

Coconut Roasted Sweet Potatoes | www.thatwasvegan.com

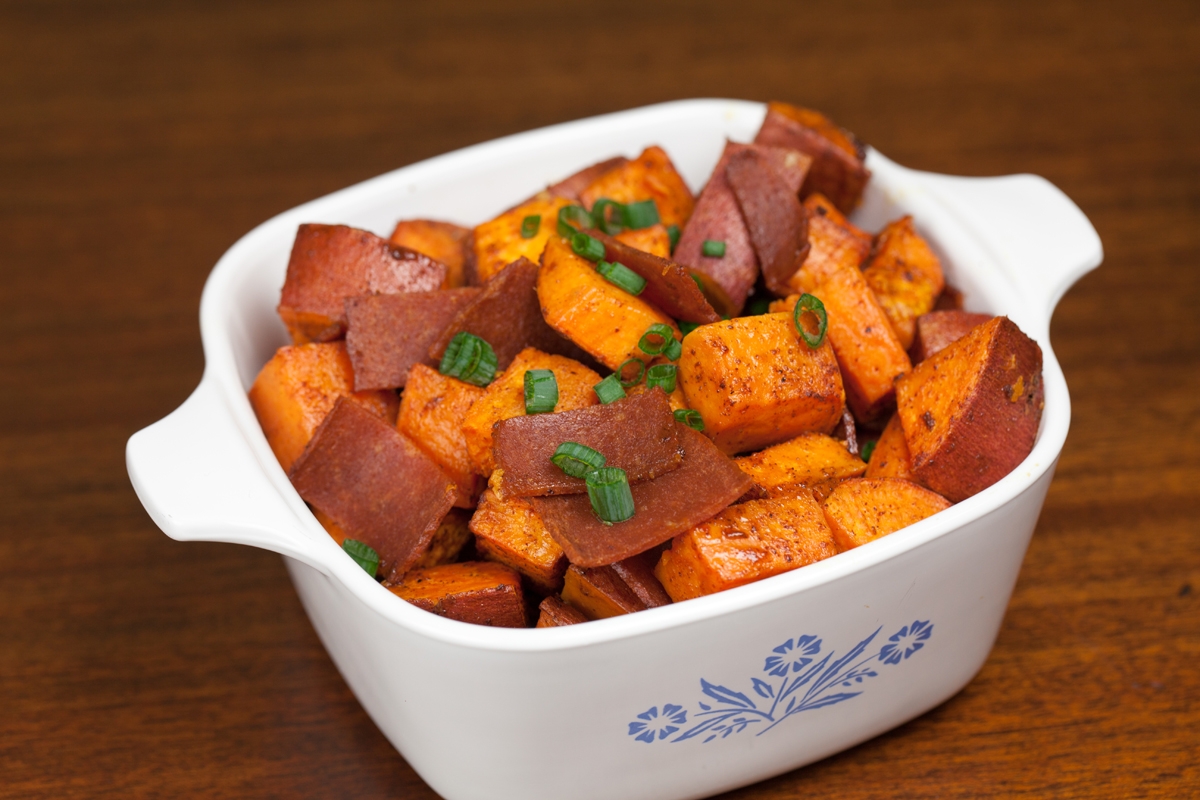
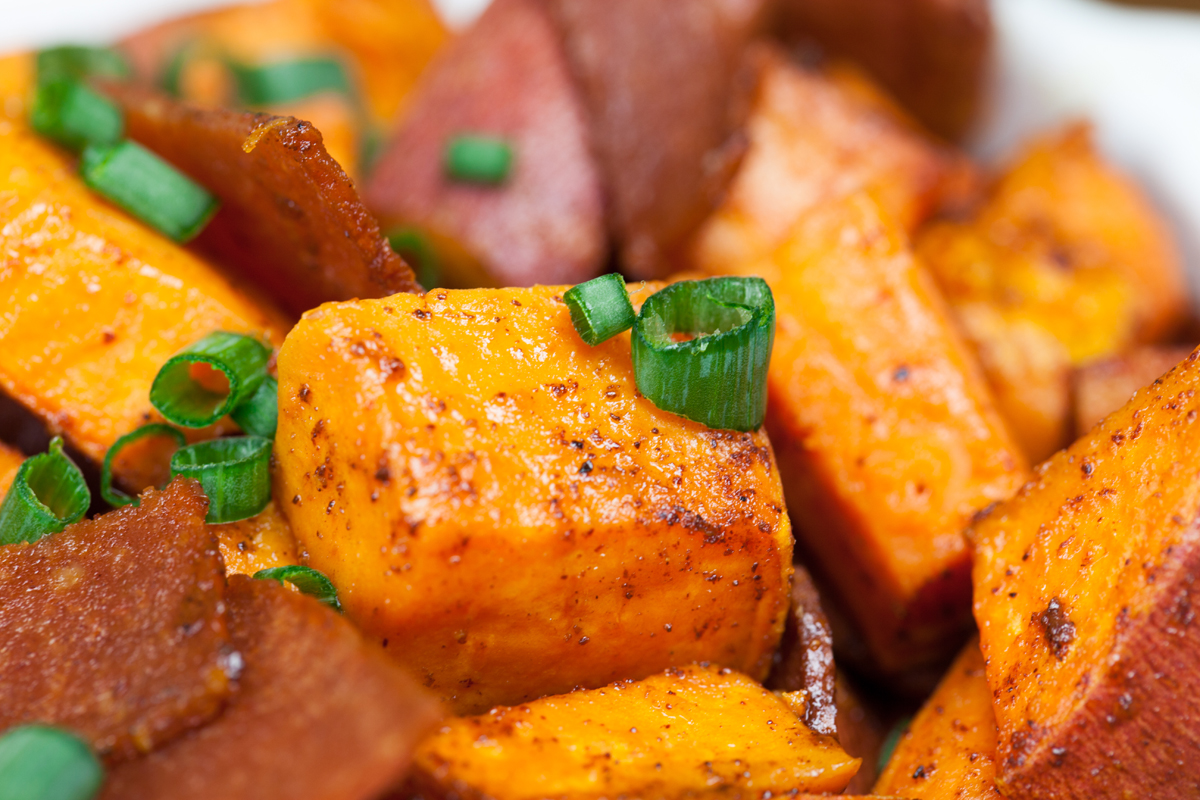
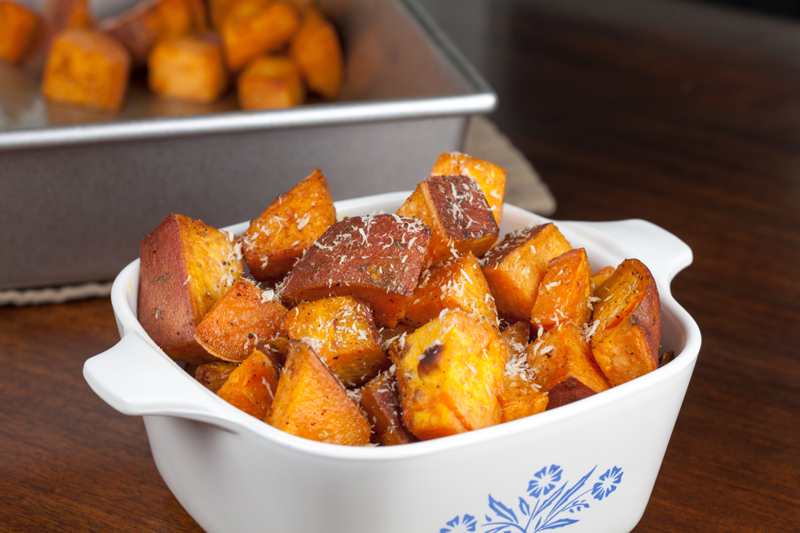
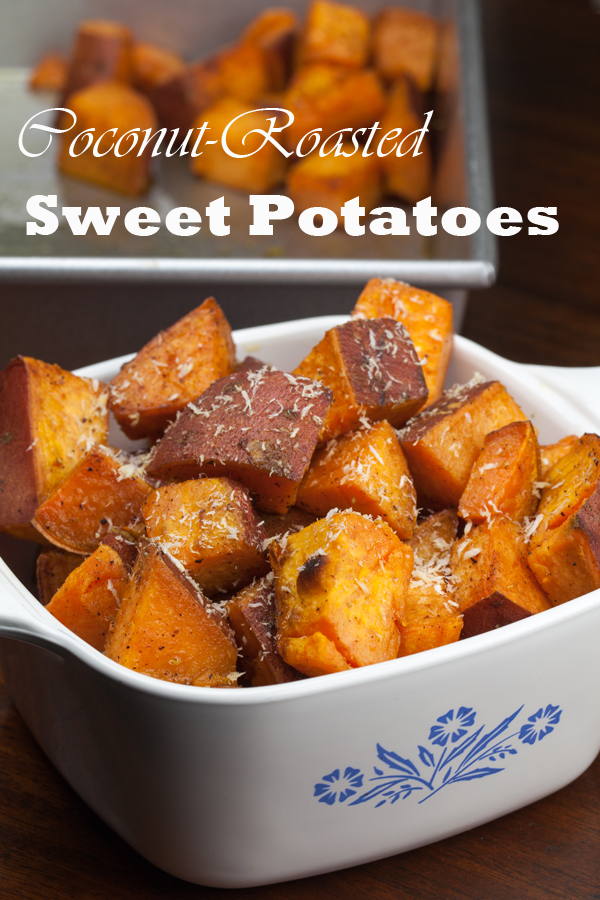
I hope you’re not sick of sweet potatos yet, because I have another one for you: Coconut Roasted Sweet Potatoes! They’re easy yet fancy, and would make a perfect side dish for any holiday or family meal. Ooh, you should make these for Easter dinner! I don’t celebrate Easter. Growing up it was all about chocolate and jelly beans in my house, and then my mom would make ham for dinner. And since I didn’t even start liking chocolate (except white!) until I was in my 20’s, it really wasn’t my favorite holiday. Isn’t it weird that I didn’t like chocolate growing up? I also didn’t like salt… then one day, when I was 24 or 25, I started liking both. Is that normal? I’m going to just go ahead and assume it is. But enough about me, let’s focus on these:

Coconut Roasted Sweet Potatoes | www.thatwasvegan.com

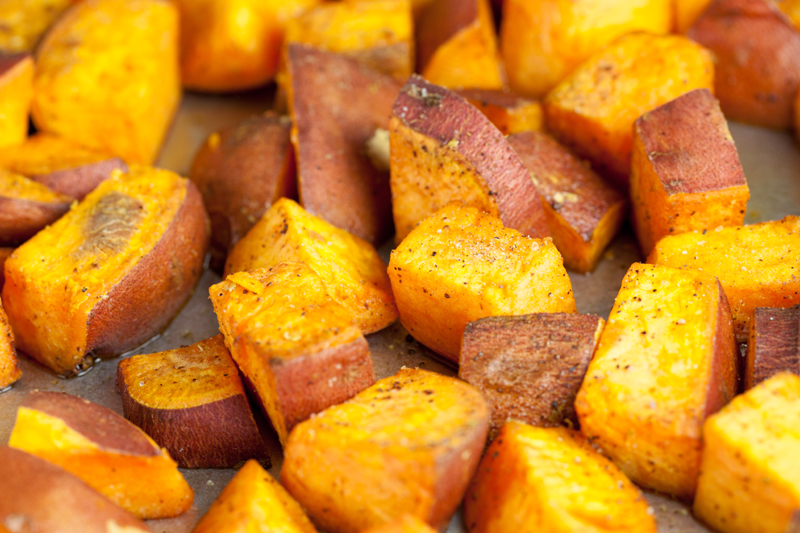
Cinnamon and coconut are the secret ingredients here.  I also used coconut oil, which I usually only use when I make dog treats. But I figured since I was already putting shredded coconut in the dish, might as well go all in.

Coconut Roasted Sweet Potatoes | www.thatwasvegan.com

So go ahead and pin these, and put them on the menu for your next big dinner. And if you’re into sweet potatoes, check out some of my other yummy sweet tater recipes!

Coconut Roasted Sweet Potatoes | www.thatwasvegan.com  

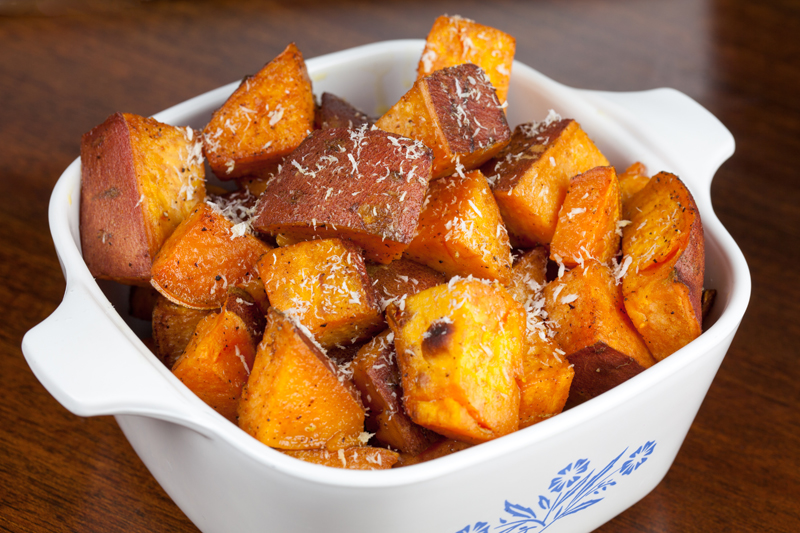
 The recipe is a (slight) adaptation from Gena Hamshaw’s dish on Food52. When you’re mixing the potatoes with the coconut oil, add 1/2 teaspoon of lime juice and 1 teaspoon of cinnamon. When they’re done baking, give another couple shakes of cinnamon and top with 1/4 cup shredded coconut. Yay!

{ 5 comments }

Spicy Pepperjack Chick’n Pizza

Vegan Spicy Pepperjack Chick'n Pizza | www.thatwasvegan.com

This pizza was amazing. You’ll eat the whole thing yourself, and it will be your dirty secret.

Or, maybe you’re like me: You eat the entire thing yourself and then blog about it to the entire world! No, no, I’m just kidding. I didn’t eat the whole pizza, I swear!

Vegan Spicy Pepperjack Chick'n Pizza | www.thatwasvegan.com

I wanted to, though.

I’m no wine connoisseur, but this pizza pairs perfectly with a crisp chardonnay! Kind of classy, right? You could absolutely make this pizza for someone special, chill a bottle of something special, and have a very romantic evening at home.

The Daiya Pepperjack shreds I used on this pizza were just perfect.  We all know how well Daiya melts, so the fact that it got all ooey-gooey was not a surprise. This time it was the flavor, that little kick, that took this pizza to the next level.

And the soy curls? Wonderful. I think they’re a great chicken substitute, but of course also have to stick in a plug for my chicken-style seitan, haha.  And I don’t want to make all those beautiful veggies feel left out, they were delicious too! My favorite pizza dough held it all together quite nicely.

Vegan Spicy Pepperjack Chick'n Pizza | www.thatwasvegan.com

If pepperjack isn’t your thing, try one of my other pizzas! Maybe a Thai Chick’n or Butternut Squash & Crispy Sage pizza is more up your alley. Or, if that someone special is sleeping over <wink, wink>, make them a Breakfast Pizza! You can see all my pizza recipes here.

Vegan Spicy Pepperjack Chick'n Pizza | www.thatwasvegan.com


Spicy Pepperjack Chick'n Pizza
Yields 1
Your *new* favorite pizza!
Write a review
Print
Ingredients
  1. One batch pizza dough
  2. 1 cup dried soy curls
  3. 1 small sweet onion, chopped
  4. 2 bell peppers, chopped
  5. 1/2 cup salsa, the chunkier the better
  6. 1.5 cups Daiya shredded Pepperjack cheese
  7. Crushed red pepper
  8. S&P
Instructions
  1. Soak the soy curls in warm water for 10 minutes. When they're done, drain the water and squeeze out as much liquid as you can. Roughly chop them, then set aside.
  2. Water saute the onion and bell peppers for 4-5 minutes, until they're tender-but-still-a-little-crisp. Remove from heat. Stir in salsa and chopped soy curls.
  3. Roll out the dough and place on pizza stone. Spread the salsa mixture evenly over the dough, then top with the Daiya cheese. Add S&P and crushed red pepper to taste.
  4. Bake at 425 until the cheese melts, ~12-15 minutes.
Notes
  1. If you usually enjoy a "saucy" pizza, add a bit more salsa for that extra moisture!
That Was Vegan? https://www.thatwasvegan.com/
{ 6 comments }

Seitan Chingalingas

Seitan Chingalingas | www.thatwasvegan.com

As I’ve mentioned quite a few times, I grew up in New Hampshire, which is *not* known for it’s authentic Mexican food. Like, at all. We had Taco Bell and we had a chain called Shorty’s. Shorty’s was my family’s restaurant of choice when we’d leave our small little town (home to a McDonald’s, a Chinese restaurant, and one or two pizza places) and venture to the relatively enormous cities of Concord or Manchester. My absolute favorite thing to order there were Chicken Chingalingas. I know, you’re shaking your head and saying “That’s not a real thing!” (unless you’re from NH too), but I swear they are. In fact, 15+ years later, they’re still on their menu:

Chingalingas: Flour tortillas filled with your choice of shredded meat or grilled veggies. Served with our homemade guacamole dressing. $8.99

Seitan Chingalingas | www.thatwasvegan.com

I googled “chingalinga” and then laughed out loud… the top hit was from another restaurant in NH that also serves them! Perhaps they’re a NH-only thing, because as soon as I left for California, I never saw them again. Well, except when I’d visit my family and we’d go to Shorty’s.

Seitan Chingalingas | www.thatwasvegan.com

They were basically miniature chimichangas, rolled up and fried. There’s probably an actual name for them, but to me they’ll always be Chingalingas.

Seitan Chingalingas | www.thatwasvegan.com

And now, I give you my version, the Vegan Seitan Chingalinga!


Seitan Chingalingas
Yields 10
The best Mexican appetizer you've never heard of!
Write a review
Print
Ingredients
  1. 1 loaf homemade chicken-style seitan
  2. 1 bell pepper (or half red and green), diced
  3. 1 onion, diced
  4. 1/2 teaspoon cumin
  5. 1/3 cup of your favorite salsa
  6. 1/2 cup vegan shredded cheddar
  7. 1/2 cup prepared rice (I used a Mexi-style rice, but you could also just use brown- although I'd season it first!)
  8. S&P to taste
  9. 10-12 small fajita-sized flour tortillas
  10. Salsa, guacamole or sour cream for dipping!
Instructions
  1. Dice your seitan and fry it with a bit of non-stick spray for 3-4 minutes until it gets a little crispy. Set aside.
  2. Water saute the veggies with the cumin 5-6 minutes. You still want them to have a bit of "bite", and not be too soft. Add the seitan back into the pan, along with the salsa, cheese and rice.
  3. Continue to heat over low until everything is warmed through. Lay out your tortillas and fill each with ~1/4 cup of the filling, and roll.
  4. Spritz with non-stick spray and bake at 400 for 8-10 minutes, until they start to brown. Flip, spritz and put under the broiler to brown the other side, just for a minute or so. Best served warm!
Notes
  1. Serve 2-3 per person with a side of rice and a nice salad, and you have dinner!
That Was Vegan? https://www.thatwasvegan.com/
{ 5 comments }

Zouq!

Zouq review | www.thatwasvegan.com

Have you heard of Zouq?  I hadn’t until they emailed me, which makes sense I guess because their products are (for now at least) only in stores in the LA area. The good news is that the rest of us can order them online!

Their South Asian snacks, which are gluten-free, msg-free, and cholesterol-free come in four flavors: Fiery Sticks, Golden Lentils, Jubilee Mix and Curry Crunch.

The first one I opened (and also my favorite) was the Curry Crunch. It was a little bit sweet and full of curry flavor. It also had the best mixture of pieces, I thought. Rice flakes, crunchy chickpeas, green peas, and loads of other little bites.

Next I tore into the Jubilee Mix. Like the curry flavor, lots of different pieces and textures going on in there. There were even raisins!

The Fiery Sticks were a little hard for me to get into, all I could really taste was “hot”.  I thought I was going to love them because they reminded me of the potato sticks I used to eat as a kid, but they were just too spicy for me. If you’re a heat-lover though, these would be perfect for you!

Finally we have the Golden Lentils which were tasty, crunchy little guys, and were perfect for pouring directly into your mouth, ha ha.

Overall, I was really happy with my Zouq snacks. If I were to order more, I’d definitely go with the Curry Crunch or the Jubilee Mix. I liked how they had a real variety of shapes and sizes, many of which were large enough for me to pull out one at a time, which is the way I tend to snack.

{ 2 comments }

Easy Bruschettini

Easy Bruschettini | www.thatwasvegan.com

Find yourself needing a quick yet impressive appetizer or finger food? Easy Vegan Bruschettini to the rescue! I was at my local sprouts doing my weekly shop on a Saturday afternoon, and happened upon an Asturi Bruschettini display case. I immediately knew that I needed a nice nosh and a glass of wine when I got home, so I grabbed a package of their Olive Oil flavor and threw it in my cart. But what was I going to put on them?

Easy Bruschettini | www.thatwasvegan.com

Hummus sounded great (as it always does!) but I wanted something fancier than just dipping, so I also grabbed a couple perfectly ripe roma tomatoes and some basil. Well, actually an entire basil plant that I planned to pot as soon as I got home (spoiler alert: it’s dead), and called it a day.

Easy Bruschettini | www.thatwasvegan.com

Again, not entirely true. I finished my grocery shopping first. I’m not such a lush that as soon as I think of wine and snacks I forget where I am and what I’m doing! Well, not usually anyway, haha! Oh, and the plates I used for showing off my faboo little creation? These are my fine china (she says with her pinky sticking up), I inherited them from my Grandma Barbara who I am obviously named after. She died when I was in high school, and my dad held on to them for me until I was old enough to appreciate them. And, you know, to need plates. Excuse me, I mean fine china

Easy Bruschettini | www.thatwasvegan.com

I just love the delicate little pink flowers and green leaves! Of course, as it turns out this was Grandma’s least fancy set of china. I learned from some of my Aunties a while back that it came from a grocery store promotion, where each week you could collect a different piece. Which is pretty funny, because it’s still the fanciest set of dishes I ever have or probably ever will own!

Mostly, I think they’re a really nice way for me to stay connected to my Grandma and my Dad, both of whom are gone now. Every time I pull out one of these plates I think of them and smile.

Easy Bruschettini | www.thatwasvegan.com

This hardly needs a recipe, but just in case, here it is!


Easy Bruschettini
Yields 18
Last minute guests? Serve them a finger food that's sure to impress!
Write a review
Print
Prep Time
10 min
Total Time
10 min
Prep Time
10 min
Total Time
10 min
Ingredients
  1. 18 crisps (I used Asturi Bruschettini)
  2. 2 roma tomatoes, diced
  3. 8-9 large basil leaves, cut in chiffonade
  4. Your favorite hummus (I used Sprouts garlic flavor)
Instructions
  1. Top each crisp with one-ish tablespoons of hummus, then layer with the tomatoes and basil. Does it get any easier than that?
Notes
  1. These can sit for a little while, but if you make them too far ahead you risk the hummus turning your crisps soggy!
That Was Vegan? https://www.thatwasvegan.com/
{ 4 comments }

To Press or Not to Press?

Hey guys! Today I’m sharing another one of my posts from Nasoya’s Tofu U! As a member of the Dean’s List I have the honor of sharing some of my tofu knowledge with all the wonderful people out there who are just starting to dip their toes in the world of tofu, and that’s how I came up with the idea for this particular post. Tofu can seem overwhelming the first time you open up that little pack and see all the water in there, right? In the comments, please share YOUR favorite tofu hints and tricks!

Do I Really Need To Press My Tofu? | www.thatwasvegan.com

“Do I really need to press my tofu?”

The answer to this age-old question is… Maybe. I usually press mine, and for me it’s worth the time and effort because I enjoy a really dense tofu when I’m frying or baking it. It really depends on how you’re planning to prepare the tofu, and what sort of consistency you’re after. Every type of recipe is different, so let’s break it down, shall we?

I’m using soft or silken tofu in a sauce… Do I really need to press it? Nope! I would just drain it completely and then get down to business. Whether you’re blending or simply stirring the tofu into your sauce, that extra liquid shouldn’t be an issue. Of course, if the recipe you’re following specifically instructs you to press it, you should press it.

I’m using soft or firm tofu in a cold dish… Do I really need to press it? This one depends. If you’re just cubing it and adding it to a salad or soup, then no you don’t. Draining the tofu will be enough. If you’re planning to marinate the tofu, however, I’d definitely recommend pressing it first. That allows it to soak up more of your delicious marinade!

I’m using firm or extra firm tofu in a stir-fry or recipe that calls for frying or baking the tofu… Do I really need to press it? Yes, you do, especially if you’re going for a springy tofu that’s crispy on the outside. Simply draining and patting the tofu dry wont do the trick. Which leads to your next question…

How do I press the tofu, and for how long? There are multiple tofu presses on the market, each with a different design and price point.  I’ve read both good and bad reviews about all of them, and all can be purchased online. If you’re hesitant to add to your kitchen equipment collection, there are other pressing options. The most popular (and the one I used for more than a year before I finally bought a press) is to wrap the block of tofu in a clean towel and place on a large plate. Cover with another plate (inverted so the flat side is against the tofu, then stack some  nice heavy books on top. I would use 2 or 3 sturdy books, then top those with my tea kettle. If you’d rather just use books, stack as many heavy ones on there as you can without them toppling over. It’s important to make sure nothing tips, you don’t want a mess to clean up! If you want a soft-ish tofu (or are in a rush), pressing for 10-15 minutes will work, but if you want that crisp n’ springy tofu we discussed earlier, you’re going to want to go for longer… 30 minutes at least. If you do buy a press, I recommend putting the tofu into it in the morning and leaving it in your fridge all day. That way, when you’re ready to make dinner, you have some seriously dense tofu that’s ready to soak up crazy amounts of marinade!

Of course these aren’t hard and fast rules, and the more you work with tofu the more you’ll realize what works best for you. Whichever method you go with, good luck and happy pressing!

{ 4 comments }

I’m Loving Ellovi!

I'm Loving Ellovi | www.thatwasvegan.com

My review samples of Ellovi truly couldn’t have come at a better time. Both the Body Butter and Lip Butter have helped me immensely in the last few weeks. Let me break it down for you…

Body Butter

Remember how I broke my foot? Well, what they don’t tell you is that as your foot is healing inside all that tape/aircast/walking boot, it’s also growing alligator skin.  I tried a couple other lotions and wasn’t really seeing any improvement… then I tried the Ellovi body butter. I slathered a thick layer on one evening and slept with socks on, and saw a huge difference the next morning. The following night I used my little foot scraper, then followed up with the Ellovi and socks. The next morning I could hardly recognize my crazy alligator-skin foot! My skin was so soft and smooth, it was like I had just gotten a pedicure.

This stuff is incredibly thick, soft, and substantial. I absolutely love it. I’ve since continued to use it on my legs, arms, feet hands… basically everywhere but my face. Because it’s so thick and hardworking, it would be too much for the face. Which is probably why it’s called BODY butter.

Now, let’s talk ingredients! From their website:

We believe that what you put on your skin goes more than skin deep. Which is why we are committed to keeping our products free of anything that doesn’t come straight from nature.

Their Body Butter has just a handful of natural, raw, vegan ingredients: macadamia nut, coconut, marula nut, hemp seed, and shea. No preservatives, parabens, or synthetic ingredients, and absolutely nothing you can’t pronounce! And, of course, it’s not tested on animals, and is certified vegan.

Lip Butter

My next physical disaster wasn’t far behind. 2 weeks ago I had the. worst. flu. ever. Ever! My lips and nose were both chapped (I feared!) beyond hope. I know you know what I mean, we’ve all been there. Breathing through your mouth and blowing your nose every 7.2 seconds wreaks havoc on your face.

I didn’t think to start using the Lip Butter until a day or two into my flu, so I was already chapped, but after a couple applications my lips were almost back to normal. And it was actually healing, it wasn’t just a slather of wax on top of my still-chapped lips. Using my (clean!) finger I also applied the butter to my poor, red nose. Surprise, surprise, it kept my skin from peeling!

Bottom Line: I’m beyond happy with these products. There are products you get for free that you think are okay, but wouldn’t buy yourself. Then there are products that you can’t wait to spend your own money on, just so you know you’ll never run out of them. That’s Ellovi! I’m a customer for life!

*I was provided free product to review, but the opinions are 100% mine!

{ 2 comments }

Cherry Beet Smoothie

Vegan Cherry Beet Smoothies | www.thatwasvegan.com

I was going to call this the Cherry Beet Cabbage Pear Chia Smoothie, but that just sounded silly. Then I was going to call it the Cheery Beet Smoothie because c’mon, who wouldn’t be cheered up by something so delightfully pink? And even more important than the color (I guess?) are all the nutrients jam-packed in there!

Vegan Cherry Beet Smoothies | www.thatwasvegan.com

Beets are a particular favorite of mine, one of those things I enjoy year ’round. I love to bake them in the winter and grill them in the summer… and this is actually my first time enjoying them in a smoothie! They’re full of vitamins and minerals, including potassium, magnesium, fiber, phosphorus, iron, vitamins A, B & C, beta-carotine and folic acid, just to name a few.  I’m a total fan-girl for beets, in case you couldn’t tell.

Vegan Cherry Beet Smoothies | www.thatwasvegan.com

I’ve been making more smoothies in general, actually, now that the weather is getting nicer. I like to whip one up in the evening and store it in an airtight mason jar in the fridge. In the morning I’ll throw it into the freezer for 30 minutes then have it for breakfast. This recipe makes a blender full, and comes in at just under 400 calories which makes it perfect for a meal.

Most of the smoothies I make are green, which is what makes this one extra special. Just seeing it makes me feel better!

What are your favorite smoothie ingredients?


Cherry Beet Smoothie
Drink your beets!
Write a review
Print
Ingredients
  1. 1 small beet, peeled and chopped
  2. 1 cup chopped cabbage
  3. 8 frozen (pitted!) cherries
  4. 1 large pear, washed and quartered
  5. 1 tablespoon chia seeds
  6. 1/4 cup So Delicious unsweetened vanilla yogurt
  7. 1/2 cup non-dairy milk
  8. 1 cup water
  9. ice
Instructions
  1. Add all ingredients to your blender, then fill the rest of the way with ice. If your blender isn't very strong, start with about half of the solid ingredients, and all of the liquid, and then add from there.
  2. Blend until smooth. This could take a couple minutes depending on your blender.
  3. Serve immediately OR store in an airtight container like a mason jar until you're ready!
Notes
  1. Try and use a really ripe, juicy pear if you can find one!
That Was Vegan? https://www.thatwasvegan.com/
{ 12 comments }

Spicy Drunken Noodles with Italian Sausage

Vegan Spicy Drunken Noodles with Italian Sausage

When you want pasta but still want something different, these Vegan Spicy Drunken Noodles with Italian Sausage are guaranteed to hit the spot! Based on a recipe I found on Pinterest, these noodles are spicy, filling and full of red wine and vegan Italian sausage.

Vegan Spicy Drunken Italian Noodles

Lots o’ veggies in there too. Use whatever kind of pasta you love. I actually used lasagna noodles that I wanted to get rid of. I cooked them, then sliced them lengthwise into thirds. I was basically going for something like an egg noodle. Only, you know, without the egg. Worked great!

I hope you guys all had a wonderful weekend! It snowed here which is crazy because it’s supposed to be spring, but also not crazy at all because here in Colorado we get all sorts of weather all year ’round. And now it’s a whole new week. I hope your week is a good one, and I hope it includes some deliciously spicy noodles!


Spicy Drunken Noodles with Italian Sausage
Serves 4
A whole new take on "drunken noodles"!
Write a review
Print
Prep Time
15 min
Cook Time
15 min
Total Time
30 min
Prep Time
15 min
Cook Time
15 min
Total Time
30 min
Ingredients
  1. 8 lasagna noodles
  2. 1 sweet onion, sliced
  3. 2 bell peppers, sliced
  4. 2 cloves garlic, minced
  5. 1.5 teaspoons Italian seasoning
  6. 1 teaspoon salt
  7. 1 teaspoon crushed red pepper
  8. 3/4 cup red wine
  9. 3 vegan Italian sausage links, roughly diced
Instructions
  1. Cook the noodles per package instructions, rinse with cold water and slice lengthwise into fourths, then set aside.
  2. Water saute the onions for 3 minutes, then add the peppers and continue to cook for another 2-3 minutes. Add the seasonings, sausage and wine and continue to cook over medium heat for 4-5 minutes, stirring occasionally.
  3. Once the wine has cooked down a bit, add the noodles into the pan. Give it a good mix and keep it over the heat until the noodles are warm, then serve!
Notes
  1. I used lasagna noodles because A.) I couldn't find vegan egg noodles, and B.) I had some to use up. This would still be yummy with your favorite type of pasta, whatever that is!
Adapted from The Cozy Apron
That Was Vegan? https://www.thatwasvegan.com/
{ 7 comments }

Vegan Maple Bacon Sweet Potatoes

These.

Vegan Maple Bacon Sweet Potatoes | www.thatwasvegan.com

They’re just ridiculous. You should only make them if you’re prepared to eat them all yourself because I promise you, you wont want to share.

These Vegan Maple Bacon Sweet Potatoes will turn you into a greedy jerk who hogs all the food.

Vegan Maple Bacon Sweet Potatoes | www.thatwasvegan.com

My first week post-flu (but unfortunately not post-laryngitis) has just flown by. It’s nice to be back into a schedule and feeling normal. It’s especially wonderful to be able to get outside and enjoy all this sunshine and the mild temperatures.

Are you enjoying spring weather where you live?


Vegan Maple Bacon Sweet Potatoes
Serves 4
Take your sweet potatoes to a whole new level with this amazing side dish!
Write a review
Print
Prep Time
10 min
Cook Time
50 min
Total Time
1 hr
Prep Time
10 min
Cook Time
50 min
Total Time
1 hr
Ingredients
  1. 2 lbs sweet potatoes
  2. 2 tablespoons olive oil
  3. 1/4 cup *real* maple syrup
  4. 1/2 teaspoon nutmeg
  5. 1 teaspoon cinnamon
  6. 1/4 teaspoon sea salt plus a couple cracks of fresh black pepper
  7. 1 package vegan bacon (I used Lightlife Smart Bacon)
  8. 2-3 scallions, chopped
Instructions
  1. Wash and chop your potatoes, leaving the skin on. Mix in a large bowl with all other ingredients except the bacon and scallions.
  2. Transfer to baking sheet and spread out. Bake 45 minutes at 375.
  3. While the potatoes are in the oven, cook the bacon per package instructions. Chop and set aside.
  4. When the potatoes are done, mix in the bacon and taste... I added a bit more salt and another drizzle of maple syrup at this point. Put under the broiler for 2-3 minutes on low to give everything a nice crispy edge.
  5. Top with scallions (and maybe another drizzle of syrup if you're crazy like me!), and serve immediately.
Notes
  1. I recommend adding a little applewood smoked seasalt to the bacon while you're cooking it!
That Was Vegan? https://www.thatwasvegan.com/
Related Posts Plugin for WordPress, Blogger...
{ 8 comments }
Social media & sharing icons powered by UltimatelySocial