≡ Menu

So Delicious Coco Whip!

So Delicious Coco Whip

Just in time for the holidays, So Delicious has done it again. They’ve created something so mind blowingly amazing that we’re all going to run out and buy a case and eat it all and never stop talking about how good it tasted. 

Seriously.

CocoWhip you guys. So Delicious Dairy Free CocoWhip Coconut Milk Whipped Dessert Topping, to be exact. It’s basically like that cool whip stuff, except a lot more compassionate and even more delicious because it tastes a bit like coconut.

From their press materials: 

Made with organic coconut milk, this dairy free delight is naturally sweetened. We never use artificial sweeteners, flavors or colors. Try a dollop of CocoWhip on fresh fresh fruit or your favorite dessert, use it in recipes, or simply lick it off a spoon!

It comes in two varieties: Regular and Light. I highly recommend the regular (the one in the blue package) as it’s thicker. The light tasted just as delicious, but it was pretty thin. This is the regular, which I scooped onto some Amy’s Chocolate Cake (because everyone keeps like 12 of these in their freezer, right?)

My second favorite thing about this stuff (after the flavor, obvs) is that you can defrost and refreeze as many times as you need to- it wont go bad if you’re not planning to use it all right away!

So Delicious Coco Whip


 CocoWhip should be in the freezer section of your local Whole Foods Market by now, and will be rolled to other retailers in Spring 2015. Go get some for your holiday feasts! 

*I was provided product to review, but the opinions are 100% mine!

{ 1 comment }

Cornbread Waffles Smothered in Spicy Chili

Cornbread Waffles Smothered in Spicy Chili

It’s winter. It’s cold out. We’re all wearing sweaters and craving some stick-to-your-ribs foods, which is where my Vegan Cornbread Waffles Smothered in Spicy Chili comes in! I made this for dinner a couple weeks ago while we were in the middle of that crazy cold snap, and it was perfection.  

It uses my Insanely Easy Vegan Chili and also gave me an excuse to use my new waffle maker. I’m not one of those people who has kitchen gadgets busting out of my cabinets, and put off buying a waffle maker because I thought “Is this really necessary? Probably not!” but now that I have it, I love it! I’ve been using it about once a week, so look for more waffle recipes in the future.

For now though, this is all you need: A savory cornbread waffle and some hot, spicy chili. Sure, you could make corn muffins to go with your chili, but where’s the fun in that?

Cornbread Waffles Smothered in Spicy Chili

I also took this opportunity to add some more ingredients to my Easy Chili – Mainly sweet corn and chopped bell peppers, because why not!? There was some Daiya cheese in there too…

Cornbread Waffles Smothered in Spicy Chili

Cornbread Waffles Smothered in Spicy Chili

One of my favorite things about this dish, besides how delicious and hearty it is, is how easy it is to change up the chili depending on who you’re serving. Add in extra veggies, or make it extra, extra spicy – It’s all good!

Oh, I’m sorry… Did you want another close-up?

Cornbread Waffles Smothered in Spicy Chili


Vegan Cornbread Waffles
Serves 2
Write a review
Print
Prep Time
10 min
Cook Time
15 min
Total Time
25 min
Prep Time
10 min
Cook Time
15 min
Total Time
25 min
Ingredients
  1. 1/2 large banana
  2. 3/4 cup unsweetened almond milk
  3. 2 tablespoons vegan butter, melted and then slightly cooled
  4. 1 1/2 tablespoons agave or maple syrup
  5. 1/2 cup Masa harina
  6. 1/4 cup fine/medium ground cornmeal
  7. 1/4 cup AP flour
  8. 1 teaspoon baking powder
  9. 1/2 teaspoon salt
  10. Half batch Easy Vegan Chili, PLUS ~1 cup sweet corn and 1/2 bell pepper, chopped, hot
Instructions
  1. Preheat & oil your waffle maker as you normally would.
  2. In a mixing bowl, mash the banana with a fork. Pour in the milk and mix together. It's okay if it's a little lumpy as long as you get rid of the larger chunks. Add in the vegan butter and agave and mix.
  3. Combine the dry ingredients in a separate bowl and slowly add to the wet ingredients just until combined. Do not overmix!
  4. Let sit on the countertop undisturbed for 5 minutes or so, then scoop into your waffle maker cooking as you normally would.
  5. When waffles are done, top with the hot chili and enjoy!
Adapted from Edible Perspectives
That Was Vegan? https://www.thatwasvegan.com/
{ 6 comments }

Happy Friday, I hope you’re ready for another giveaway! A copy of the new YumUniverse Cookbook (print or e-book, it’s up to you), and the YumUniverse Holiday Survival Guide (e-book). I’m also sharing the recipe for this delicious Roasted Red Pepper and Tomato Bisque!

YumUniverse: Cookbook Review & Giveaway, PLUS Roasted Red Pepper and Tomato Bisque


Okay, so you’re all probably already familiar with YumUniverse the blog, but now there’s a book, too! And the thing this, YumUniverse: Infinite possibilities for a gluten-free, plant-powerful, whole-food lifestyle is more than just a cookbook.  Heather Crosby provides tons of background information on food science, nutritionism, and even a whole section of fruits and veggie storage! Basically, this book could be the perfect go-to for a new vegan. Perhaps there’s someone on your Christmas list who would appreciate a copy…?

There are tons of recipes too. I made the Creamy Broccoli and Red Pepper Macaroni (p. 236) and loved it:

YumUniverse: Cookbook Review & Giveaway, PLUS Roasted Red Pepper and Tomato Bisque

It has a creamy cashew-based sauce and tons of fresh veggies. Plus it’s a pasta, which is perfect for the cold weather we’ve been having here. The funny thing is that back when I reviewed The China Study All Star Cookbook, one of the recipes I chose to try was… Creamy Broccoli and Red Pepper Macaroni! I didn’t realize it was the same one until I had already started making it, so I grabbed a copy of TCSAS cookbook off the shelf and there it was, contributed by Heather Crosby. Clearly that recipe speaks to me, haha. 

For breakfast one morning (before work, which tells you how quick and easy this was) I made the Strawberry-Banana Crunch Snack Wraps (p. 260), which Heather describes as a healthier version of a PB&J:

YumUniverse: Cookbook Review & Giveaway, PLUS Roasted Red Pepper and Tomato Bisque

What you’re seeing there are leaves of Boston bibb lettuce stacked with fresh strawberries, seeds and nuts. I had to improvise a little (chia seeds instead of hemp, and I skipped the sliced almonds) but ohmygoodness were these delicious! So light and fresh and I felt really good after eating them, satisfied but not weighed down. A very healthy breakfast or snack!

Now what? Well, enter the contest below, print out the recipe for the delicious Bisque (also below) and then click here to check out the rest of the #YUHealthyHolidays Blog Tour!

ThatWasVegan

As promised, the recipe for the Roasted Red Pepper and Tomato Bisque is below, but first, here’s the super awesome giveaway! 


 The Giveaway

One lucky reader, to be chosen by random, is going to win the new YumUniverse Cookbook (print or e-book, it’s up to you), and the YumUniverse Holiday Survival Guide (e-book).

The contest is open until Midnight (Mountain time), Friday 11/28. The winner will be chosen randomly and announced the following day. To Enter: All you gotta do is leave a comment below telling us about your cookbook collection then log it into the rafflecopter widget. How many do you have? Are they mostly print or ebook? Or have you gone completely paper-free and only use Pinterest? Tell us!

a Rafflecopter giveaway

*I was provided free product to review but the opinions are 100% mine! 


Roasted Red Pepper & Tomato Bisque
Serves 2
Write a review
Print
Ingredients
  1. 2 red bell peppers, seeds and ribs removed, quartered
  2. 2 large tomatoes, quartered
  3. ½ cup onion, quartered
  4. 1–1 ½ teaspoons sea salt or more to taste
  5. Pinch of black pepper, plus more to taste
  6. 2 teaspoons rosemary leaves, chopped
  7. 4 cloves garlic, sliced in half
  8. 1 ¼ cups veggie stock
  9. 1⁄3 cup cashews, soaked
Instructions
  1. Preheat oven to 325°F and grease a large baking dish with oil, or line with parchment paper. Place red bell peppers and tomatoes face down in baking dish with onion, sprinkle with a pinch of salt and pepper, and roast for 25 minutes.
  2. Remove baking dish and add rosemary and garlic and roast another 7 minutes.
  3. Transfer all ingredients to the blender and purée until smooth. Season with salt and additional pepper to taste. Serve warm, so heat up on the range if you need to.
Notes
  1. psst! This also makes a nice cold soup.
  2. Serve with Cashew Sauce (in the book) and Basil & Pepper Pine Nut Crisps (in the book) to take it all to the next level of tastiness
  3. Add cooked quinoa, buckwheat, lentils, brown or Forbidden rice for more texture..
That Was Vegan? https://www.thatwasvegan.com/
{ 29 comments }

Vegan Cheesecake Sopapillas: Another Redo!

In my never-ending journey to improve this ol’ blog, I’ve been remaking (and re-photographing) some of my older dishes… and this time it’s the Cheesecake Sopapillas. The recipe and original post are here

Cheesecake Sopapillas | www.thatwasvegan.com

Cheesecake Sopapillas | www.thatwasvegan.com

Cheesecake Sopapillas | www.thatwasvegan.com

Cheesecake Sopapillas | www.thatwasvegan.com

Cheesecake Sopapillas | www.thatwasvegan.com

{ 3 comments }

Cheesy Coconut Bacon Fries

Cheesy Coconut Bacon Fries | www.thatwasvegan.com

This may sound weird coming from a vegan, but I love Cheesy Bacon Fries. Cheese. Coconut bacon. Fries. All vegan, all delicious!

Okay so maybe not as healthy a side dish as steamed broccoli, but who the heck can eat steamed broccoli everyday? Not me! Although I will admit, I do love steamed broccoli, especially with lots of salt and pepper. 

Besides, sometimes you don’t want healthy. You want hot and delicious and comforting. Especially after being outside on a day like this…

Cheesy Coconut Bacon Fries | www.thatwasvegan.com

This was Sunday, after the snow stopped falling and the sun came out. This is one of the things I love most about Colorado – You’ll have a snowy, stormy day that gives you all the excuse you need to snuggle up on the couch with your dogs and a good book, and then the next day you can throw on a layer or two and get back outside! You know, burn some calories so that when you get back home you can eat these fries guilt-free! 

Cheesy Coconut Bacon Fries | www.thatwasvegan.com

The cold snowy weather is also an excellent excuse to dress your dogs up in sweaters, but that’s a topic for another day.

And speaking of cold, I just had to share this, taken on my way to work last Thursday morning.4 degrees is seriously freaking COLD!

 photo (3)


 What are your favorite ways to reward yourself? Do you go for food or something else, like a new book or a new pair of shoes? 


Cheesy Coconut Bacon Fries
Serves 2
Write a review
Print
Prep Time
5 min
Cook Time
30 min
Total Time
35 min
Prep Time
5 min
Cook Time
30 min
Total Time
35 min
Ingredients
  1. 1 Russet potato
  2. Spray oil
  3. S&P
  4. 1/2 cup Coconut Bacon
  5. 4 slices Daiya cheddar
  6. Pinches of garlic powder and onion powder
  7. 2 scallions, chopped
Instructions
  1. Preheat oven to 425. Spray a baking sheet with spray oil.
  2. Scrub the potato and slice into fries. Spritz with the spray oil and sprinkle liberally with salt and pepper. Bake for 30-35 minutes, flipping once halfway through, until crispy.
  3. While the fries are in the oven, melt the cheese in a small pan and add the powdered onion and garlic. When the fries are done, drizzle with the cheese and sprinkle with the coconut bacon and scallions. Serve hot!
That Was Vegan? https://www.thatwasvegan.com/
{ 5 comments }

12 Delicious and Healthy Appetizers for the Holidays | www.thatwasvegan.com

It’s that time of year again, when we all enjoy gathering together with friends and family. Dinner parties, cocktail parties, tree-trimming parties, football parties, Real Housewives of Beverly Hills viewing parties (no?)… whichever kind of party you prefer, they all have one thing in common. Peoples gotta eat, and everyone loves appetizers!

Seriously, those are two scientifically proven facts. I think.

Anyway, to help you plan your next soiree I’ve put together this list of delicious appetizers that I hope you’ll find helpful!

1. Little Christmas Tree Pizzas: These were the obvious choice to top the list, being that they’re shaped like Christmas trees! They’re also easy to switch up with different veggies to please your pickiest guests.

Little Christmas Tree Pizzas

2. Easy Bruschettini: These are beyond easy, and pair perfectly with a glass of wine! Seriously, the only work you have to do is chop a few tomatoes and leaves of basil. Done. They’re also perfect for wary omnivores who aren’t keen to try any vegan substitutes- none of those here!

Easy Bruschettini | www.thatwasvegan.com

3. Spicy Grape Jelly Meatballs: These are fun because so many of us enjoyed them in our pre-gan days. And who doesn’t love meatballs on toothpicks??

Spicy-Grape Jelly Meatballs #vegan

4. Easy Stuffed Potato Skins: These are an easy app we’ve all had before- but they’re taken up a notch by using PURPLE potatoes!

Easy Vegan Stuffed Potatoes

5. New England-Style Stuffing Stuffed Mushrooms: Yes, the name is a mouthful but so are these little guys! I love this stuffing, I make it every year, and it’s even better (if that’s possible) inside little baby ‘bellas!

Vegan New England-Style Stuffing Stuffed Mushrooms

6. Garlicky-Pepper Tofu Bites with a Chili Dipping Sauce: These are a bit fancier than some of the other apps on this list, and I think they’re perfect for cocktail parties!

Garlicky Pepper Tofu Bites

7. BLPTs: That’s Bacon, Lettuce, PICKLES, and Tomatoes, in case you were wondering. These are great for the more casual gatherings. I made them last year for a SuperBowl party and they were a hit with the omnivores!

BLPT: Bacon, Lettuce, Pickles and Tomatoes

8. Cranberry Tofu Lettuce Cups: These are just plain fun! Plus they have cranberries in them so you know they’re great for holiday parties!

Cranberry Tofu Lettuce Cups

9. Crunchy Potato Bites: These would be super crazy with a vegan queso dipping sauce. They’re also wonderful as a fun side dish!

Vegan Crunchy Potato Bites | www.thatwasvegan.com

10. Loaded Baked Potato Dip: Mmmm! I realize this may sound like a strange dip but please believe me when I tell you it will go fast. I’ve served it to vegans and omnivores both, and they all loved it. It’ll go VERY fast!

Loaded Baked Potato Dip

11. Mac n’ Cheese Pockets: Puff pastry. Butternut Mac n’ Cheese. What more do I need to say?

Vegan Macaroni and Cheese Puff Pastry Bites

12. Sweet Potato & Korean BBQ Bites: Want to add something a little different to your menu? Then go with these. Seitan cooked in rich, delicious Korean BBQ sauce, spicy peperoncini, and sweet potato crisps, and the flavors all work perfectly together!

Vegan Sweet Potato and Korean BBQ Bites

{ 7 comments }

Buckle up boys and girls because I have some seriously tasty pictures and recipes to share with you today!

Tofurky 20th Anniversary | www.thatwasvegan.com

You may not realize this (I know I was surprised!) but the Tofurky Roast has been around since 1995! I always joke that vegans today are spoiled because we have such an amazing array of vegan-friendly products to choose from (ice cream, cheese, mock chicken, beef, deli meats, frozen pizzas… the list goes on and on!), but the truth is that early vegan pioneers (veganeers?) didn’t have access to these sorts of things. And I’m sure that holiday meals were especially difficult for them to navigate. Yes, vegetables and whole grains are wonderful foods, but most of us crave something special for those kinds of gatherings. Especially those of us who weren’t raised vegetarian or vegan and still have so many wonderful memories that are completely intertwined with non-vegan foods.

Which is why the Tofurky Roast was so groundbreaking! A special holiday main dish that plant eaters could pick up at their local grocer. No mess, no stress. Since then they’ve expanded their product line to include everything from pizza to quiche, but I’ll always be especially grateful to them for making it that much easier to enjoy a gentle thanksgiving. We all know there are a million benefits to eating vegan, and Thanksgiving is no exception. #saveaturkey

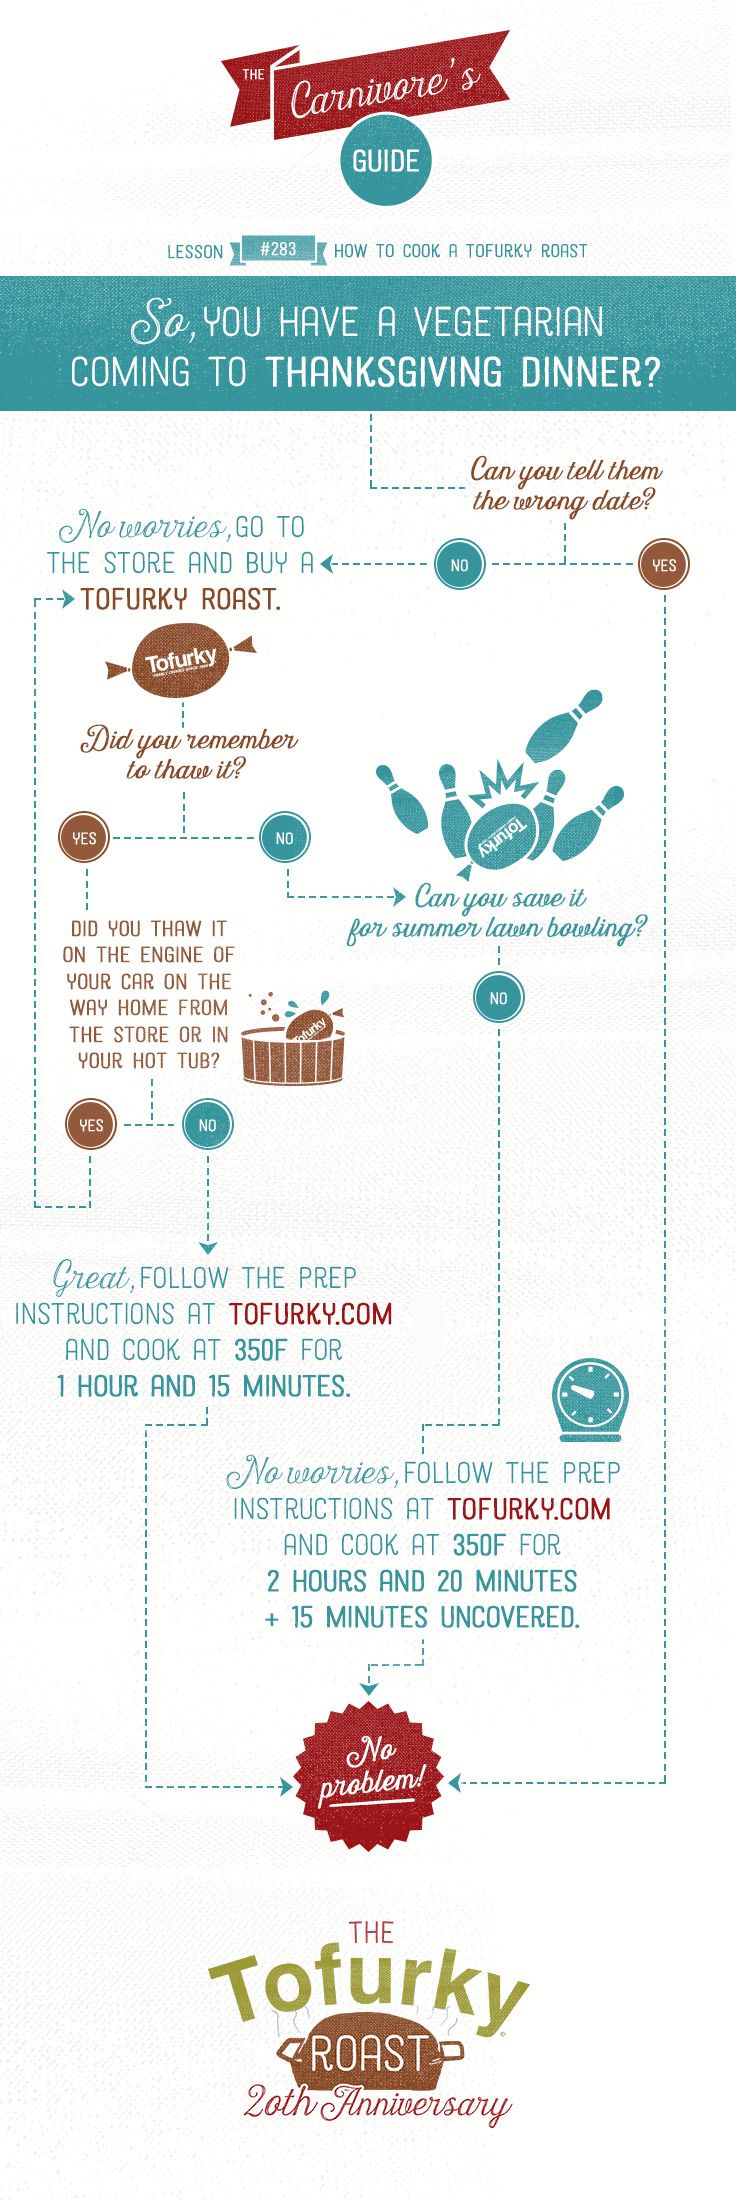
They’re also making it easier on omnivores who have invited a veg-head to their holiday meal, as well as the veg-curious who want to try hosting a compassionate gathering but maybe aren’t quite ready to create their own seitan roast from scratch. I think we all know people who fall into one of those two categories, and for them I wanted to share this funny infographic:

Tofurky 20th Anniversary | www.thatwasvegan.com

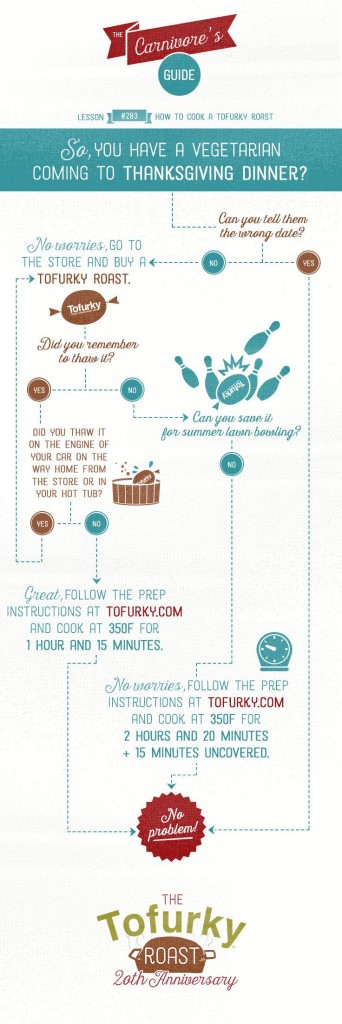
You should totally pin that and share it with the veg-curious people in your life. While you’re at it, you should follow Tofurky on Pinterest and especially their Holiday Recipes board. Tons of great recipes there. And on a more serious note, have you guys heard of Compassionate Holidays? They’re an organization dedicated to promoting exactly what their name implies, and Tofurky is a proud supporter of the movement. In fact… For every new Tofurky Pinterest follower and recipe/infographic repin from now until Thanksgiving, one Gentle Thanksgiving donation of a Holiday Roast will be donated to a non-profit! Let me repeat: You pin, they donate a Holiday Roast to a non-profit. How amazing is that? Totally gives me the warm & cuddlies! I love a company that is dedicated to helping both animals and humans.

Which I was really excited when they invited me to take part in their Tofurky Mystery Box Challenge to help them celebrate! Here’s how it worked:

They sent me a Tofurky Roast and a list of ingredients that I was allowed to use. Very much like the mystery box challenges we’ve all seen on cooking shows. My items were:

  • 1 orange
  • 1 small pumpkin
  • 1 bunch kale
  • 1 white onion
  • Fresh sage
  • Corn grits
  • Almonds

What did I come up with from that list? Two delicious side dishes to go with my Tofurky Roast…

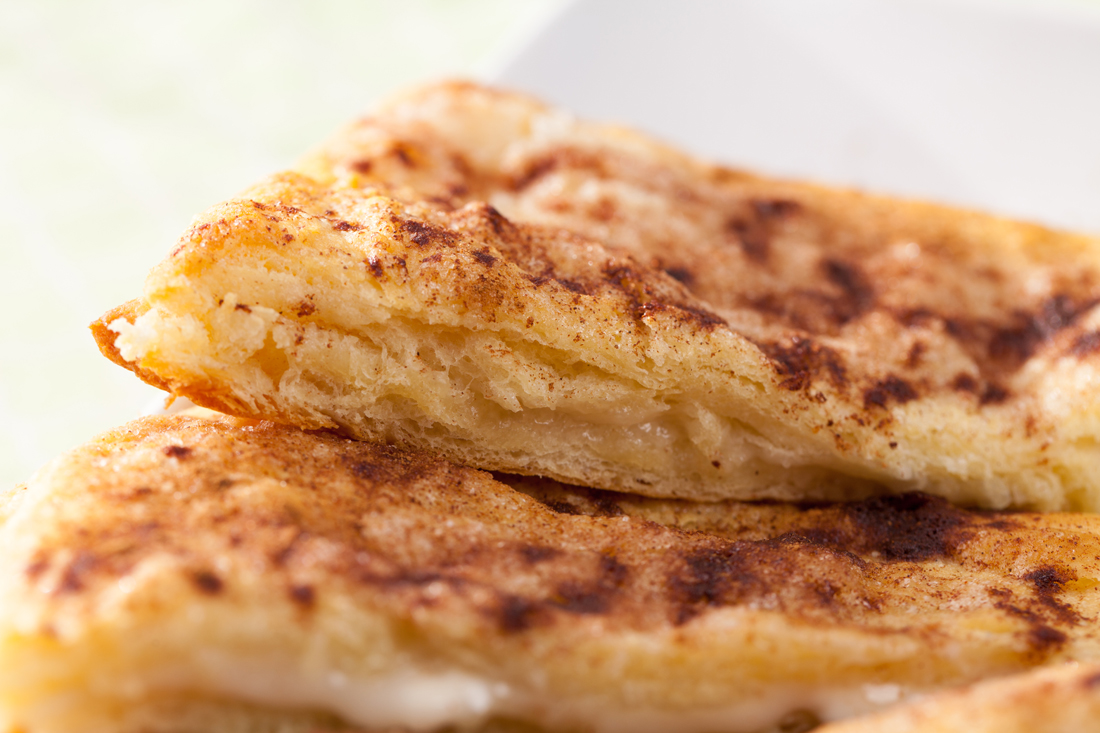
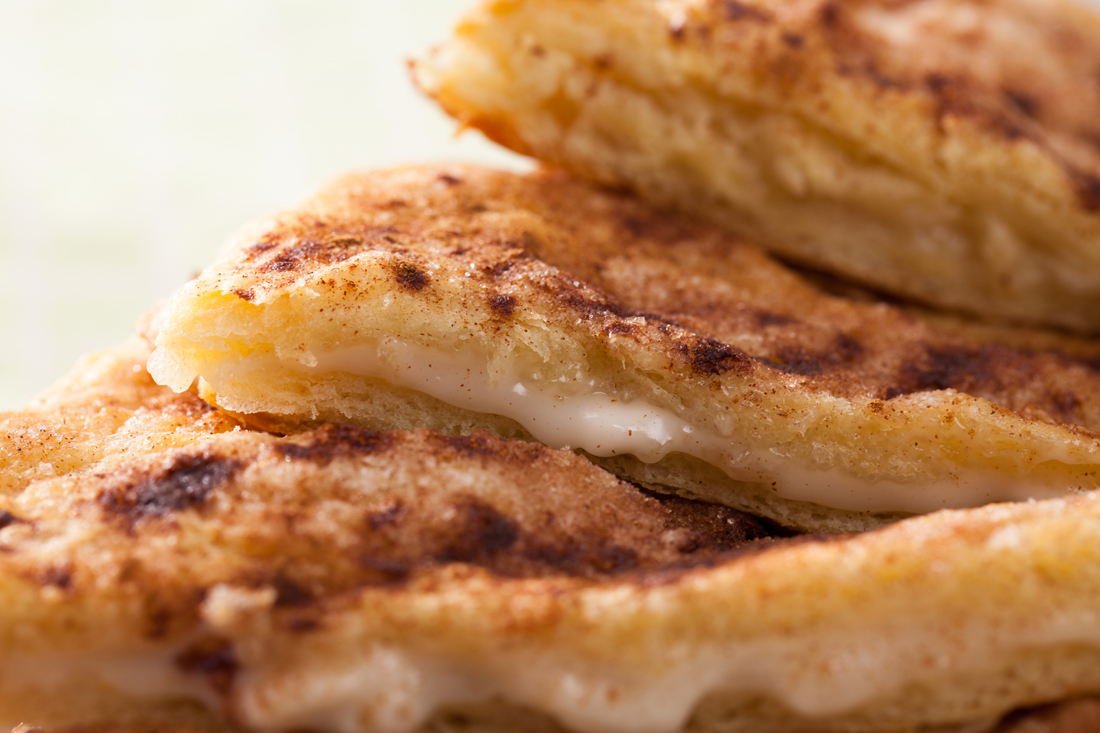
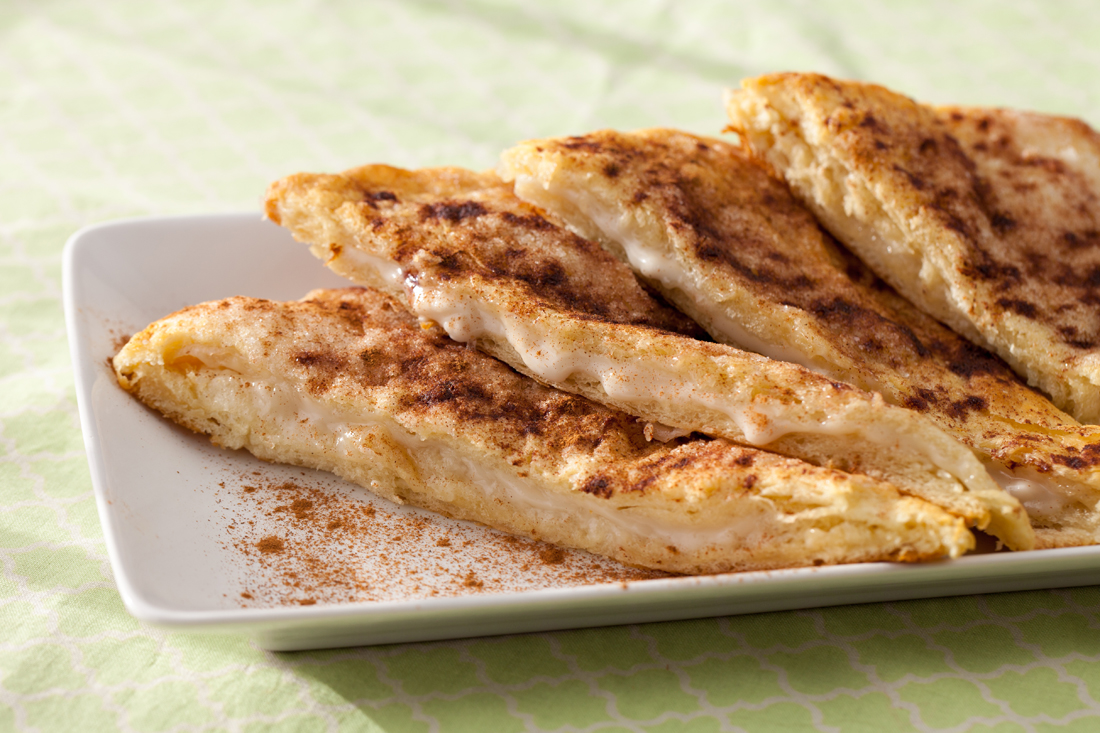
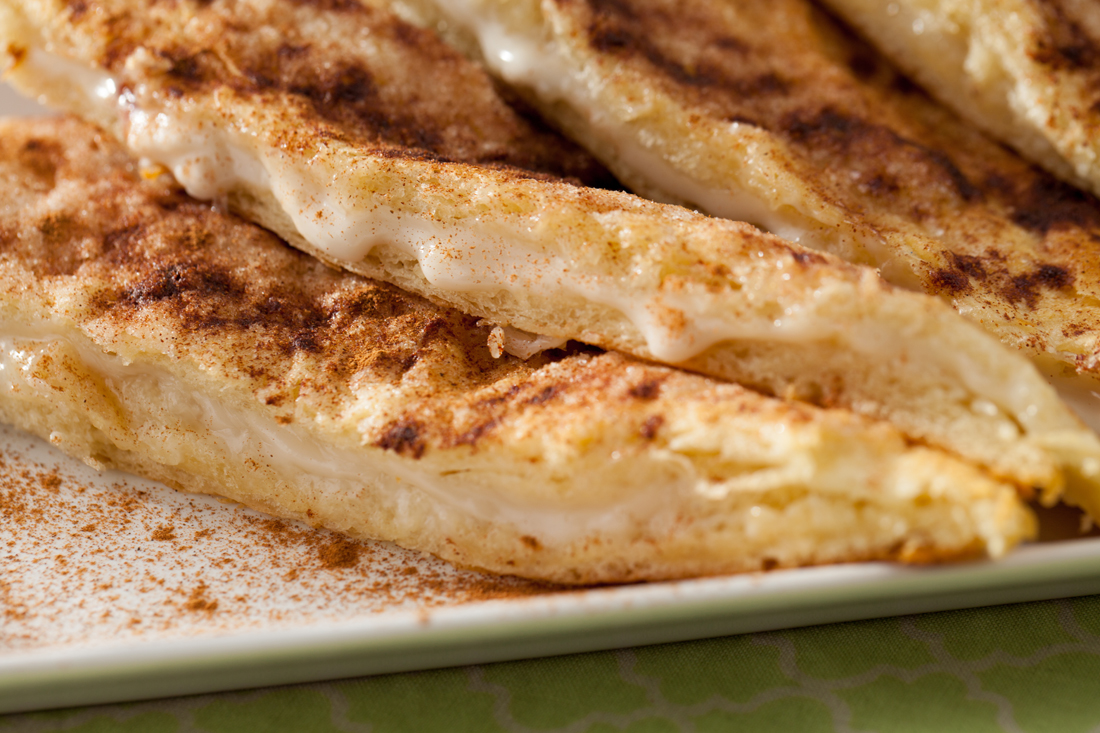
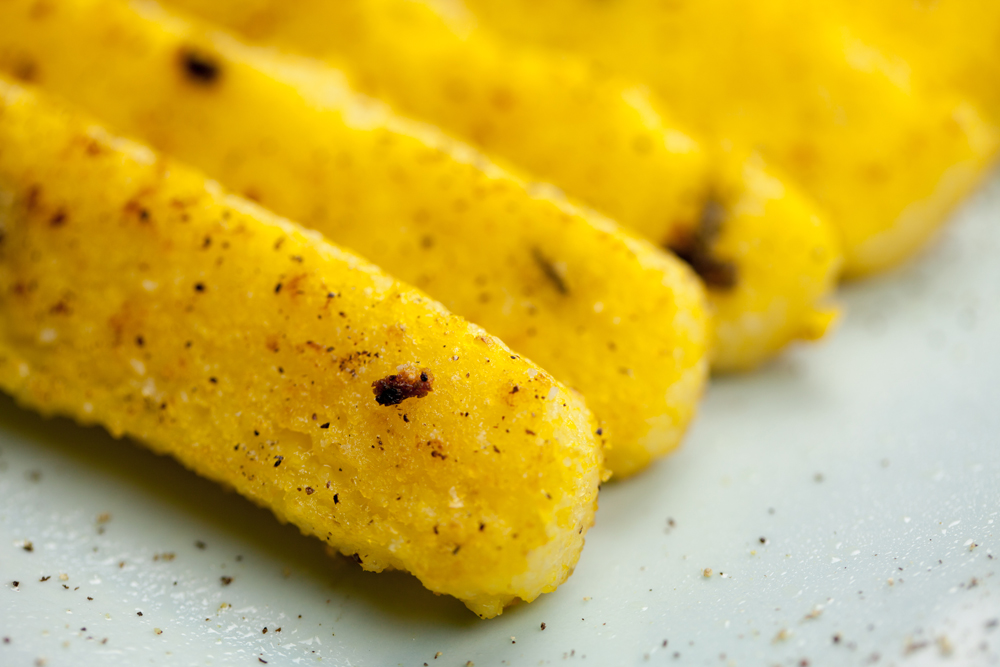
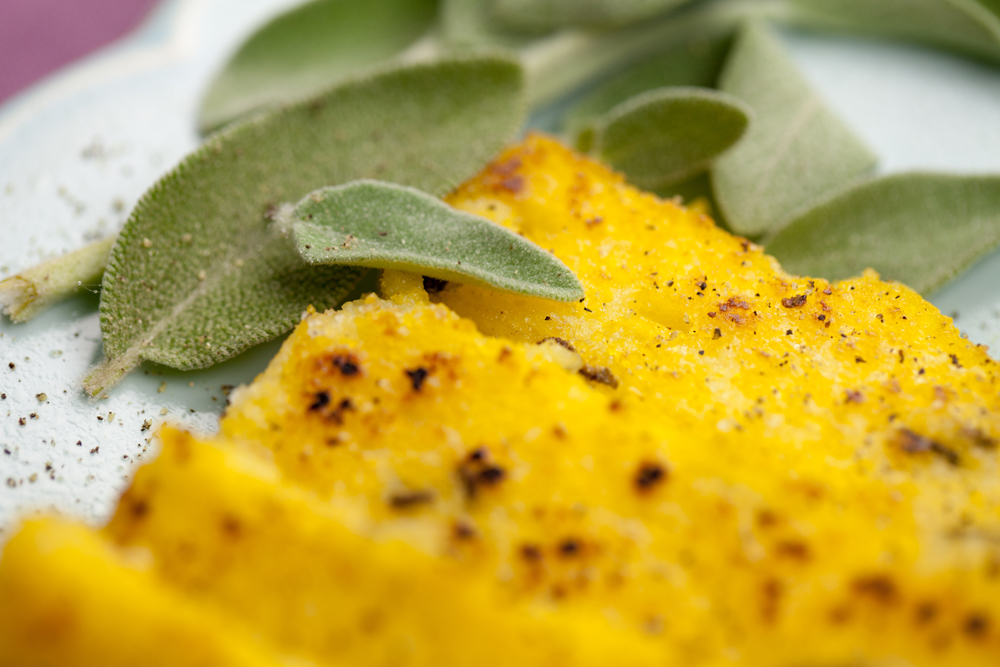
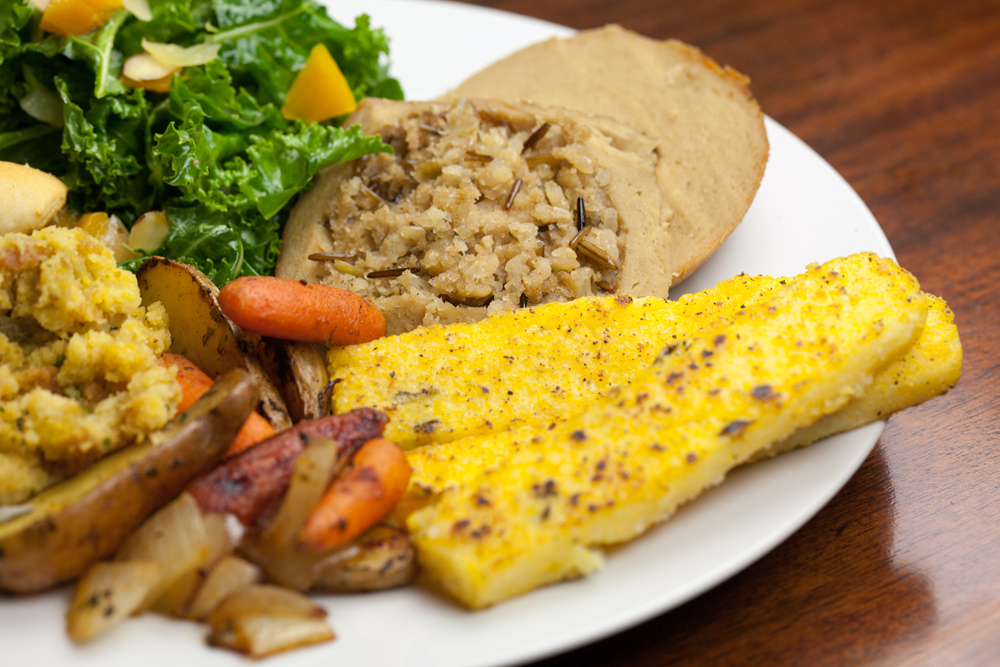
Pan-Fried Polenta with Fresh Sage: Pan fried in vegan butter, yo! Look at all the crispy goodness going on there. Hot and creamy on the inside, and full of chopped sage. So flavorful! Plus, who doesn’t like a side dish you can eat with your fingers?

Pan-Fried Polenta w/ Fresh Sage | www.thatwasvegan.com

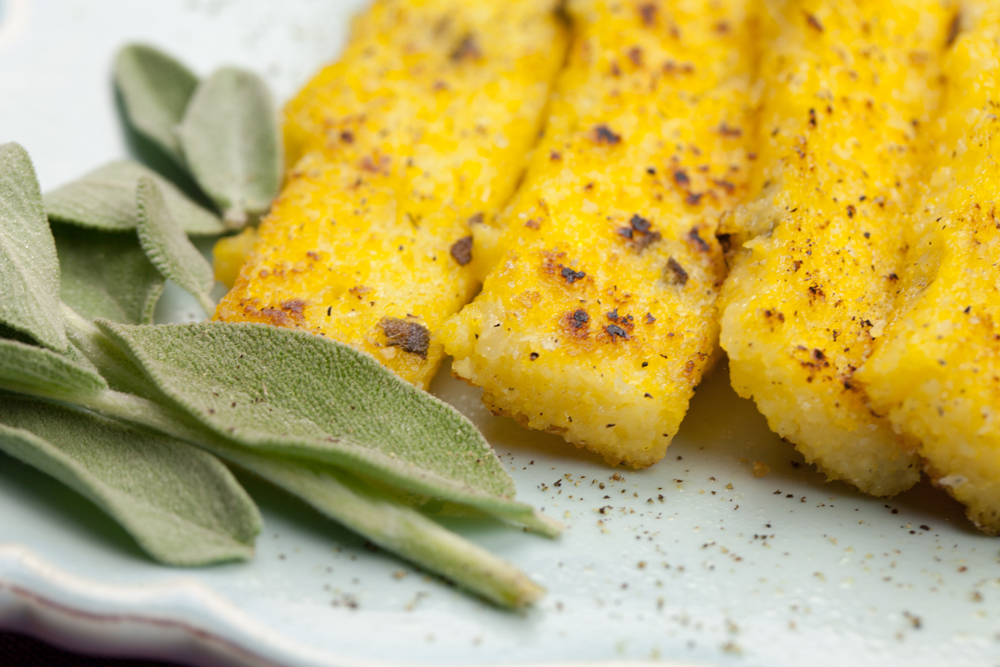
Here’s a shot from right before I sliced and fried…

Pan-Fried Polenta w/ Fresh Sage | www.thatwasvegan.com

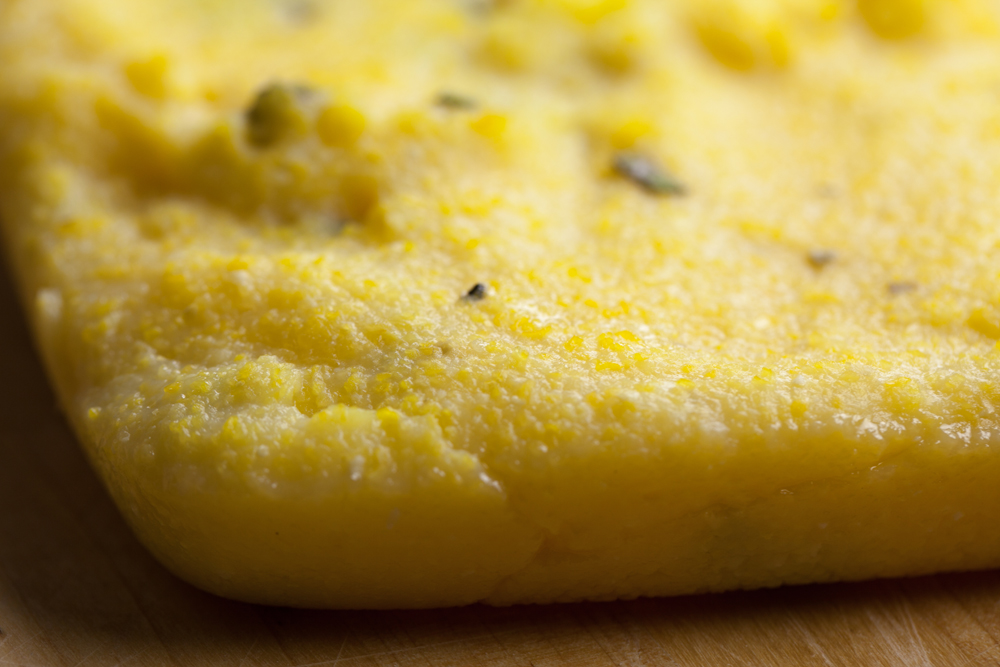
 This was my first time making Polenta from scratch, and I couldn’t believe how easy it was!

Pan-Fried Polenta w/ Fresh Sage | www.thatwasvegan.com

Pan-Fried Polenta w/ Fresh Sage | www.thatwasvegan.com

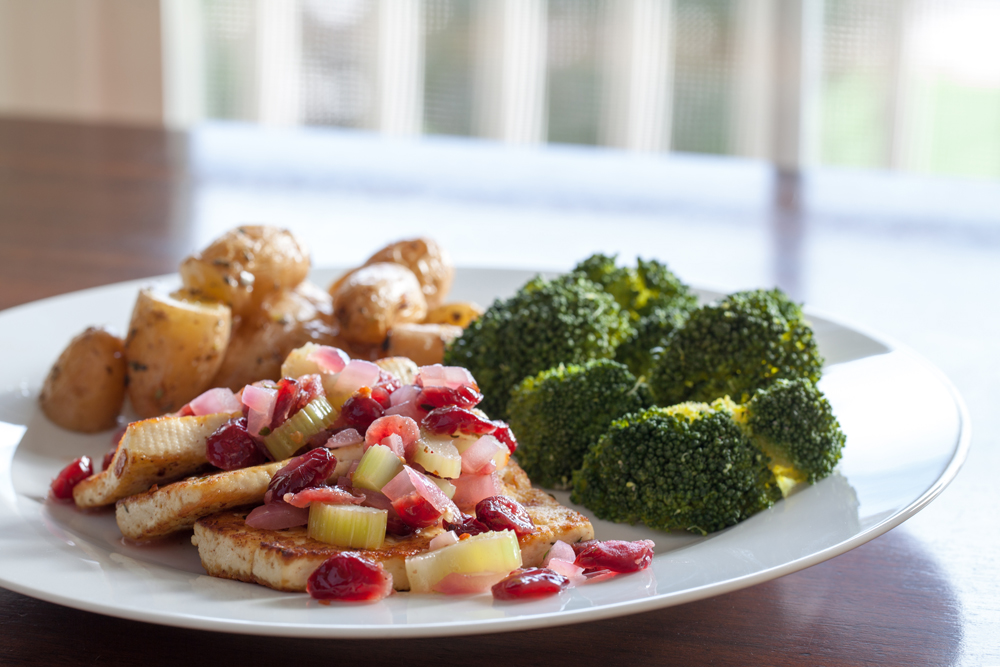
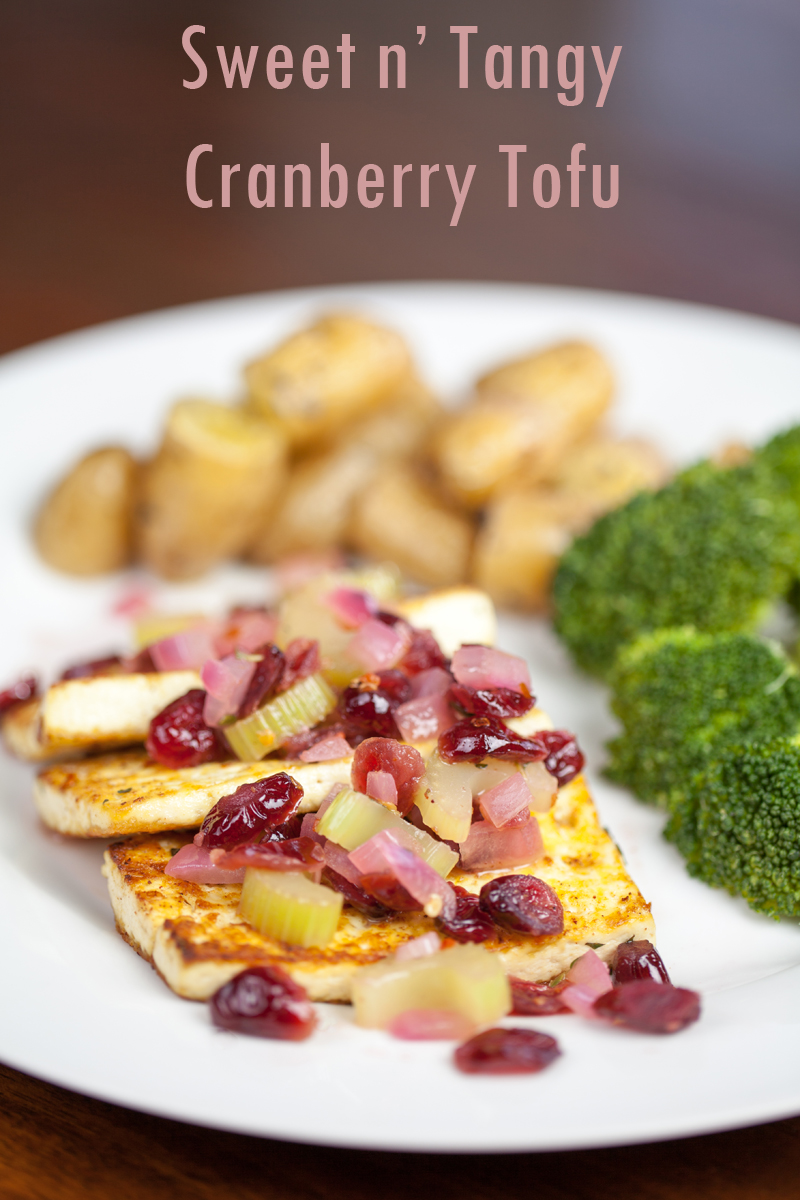
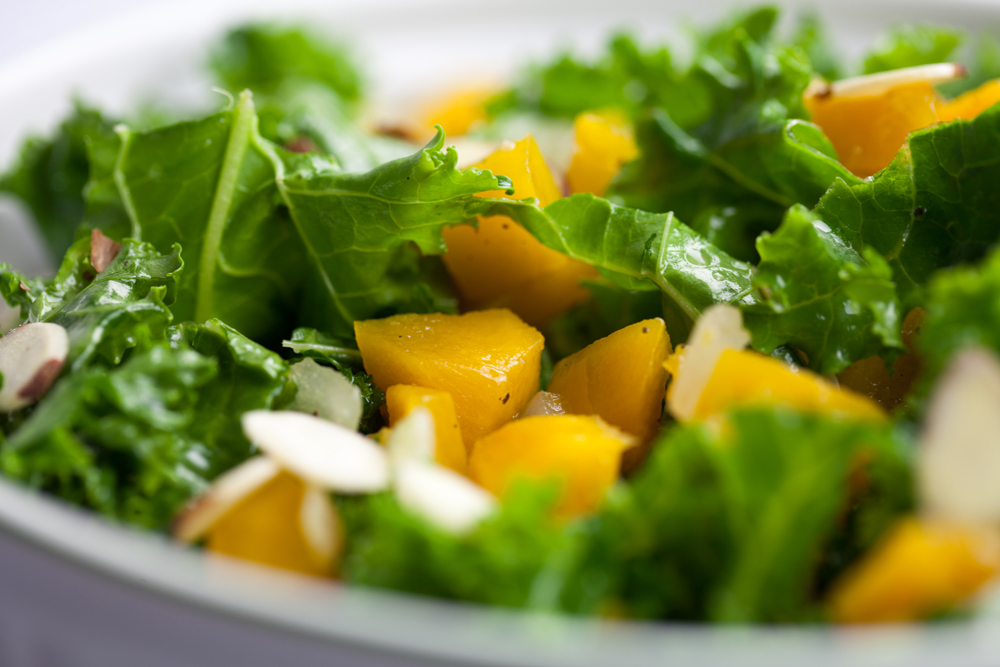
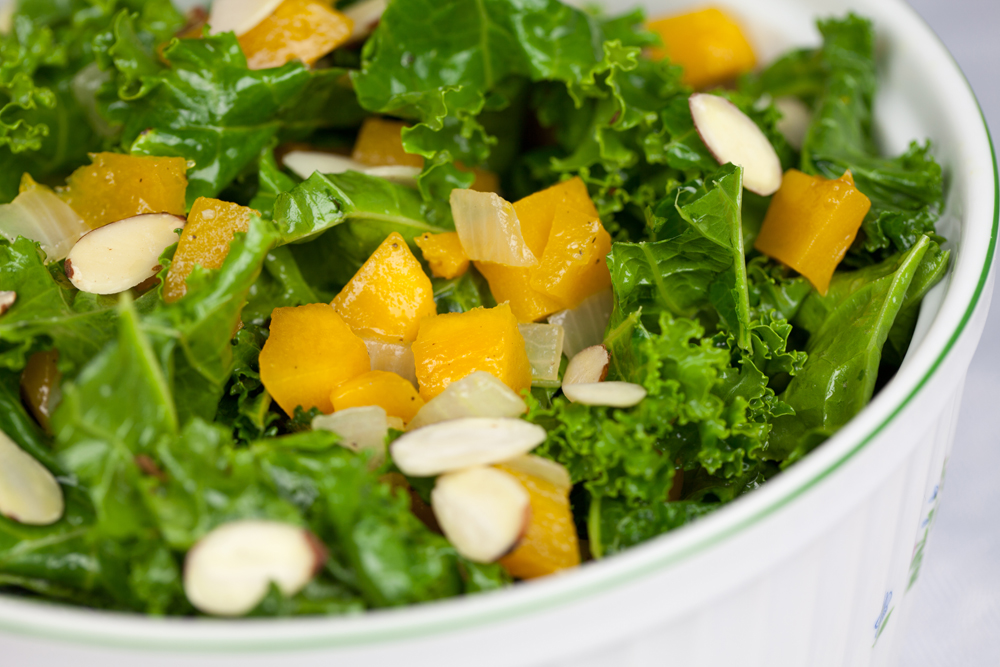
After settling on the polenta, I was left with kale, an orange,  an onion, and a pumpkin. What to do!? How about a Massaged Kale Salad with Maple Roasted Pumpkin?

 Massaged Kale Salad with Maple Roasted Pumpkin | www.thatwasvegan.com


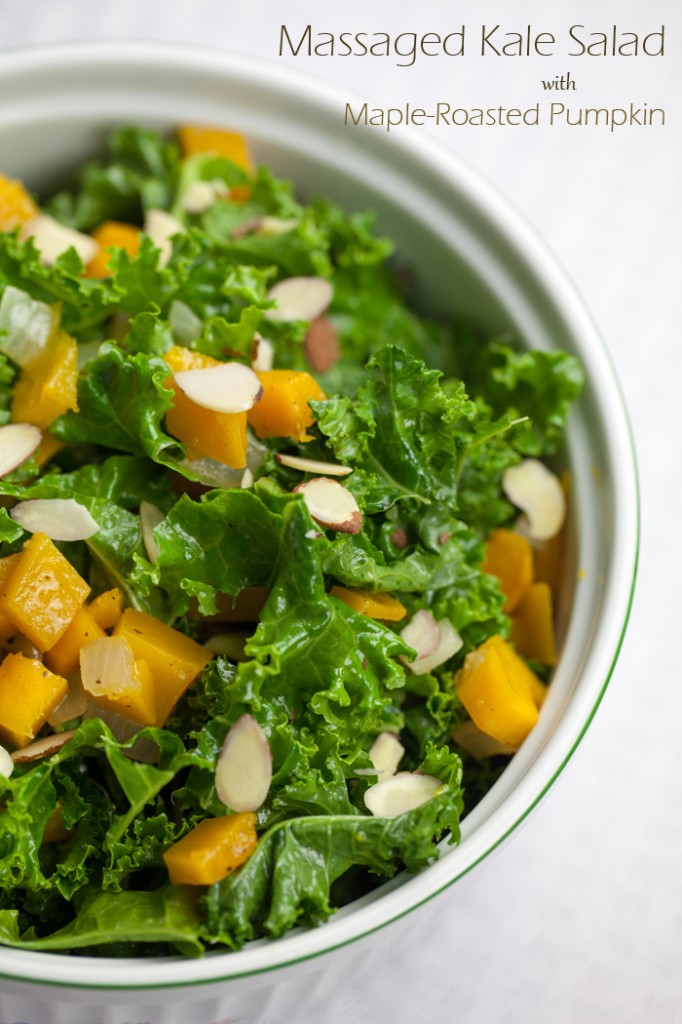
The entire recipe is below of course, but basically all I did was massage the kale with a mix of fresh orange juice, evoo, and maple syrup. Then I chopped the pumpkin and onion, mixed them with a little evoo and maple syrup, and roasted. Then everything got mixed together with the almonds, and a delicious salad was born! I just love the idea of mixing sweet, decadent flavors like maple syrup with ultra healthy veggies like kale and pumpkin!

Massaged Kale Salad with Maple Roasted Pumpkin | www.thatwasvegan.com

Massaged Kale Salad with Maple Roasted Pumpkin | www.thatwasvegan.com

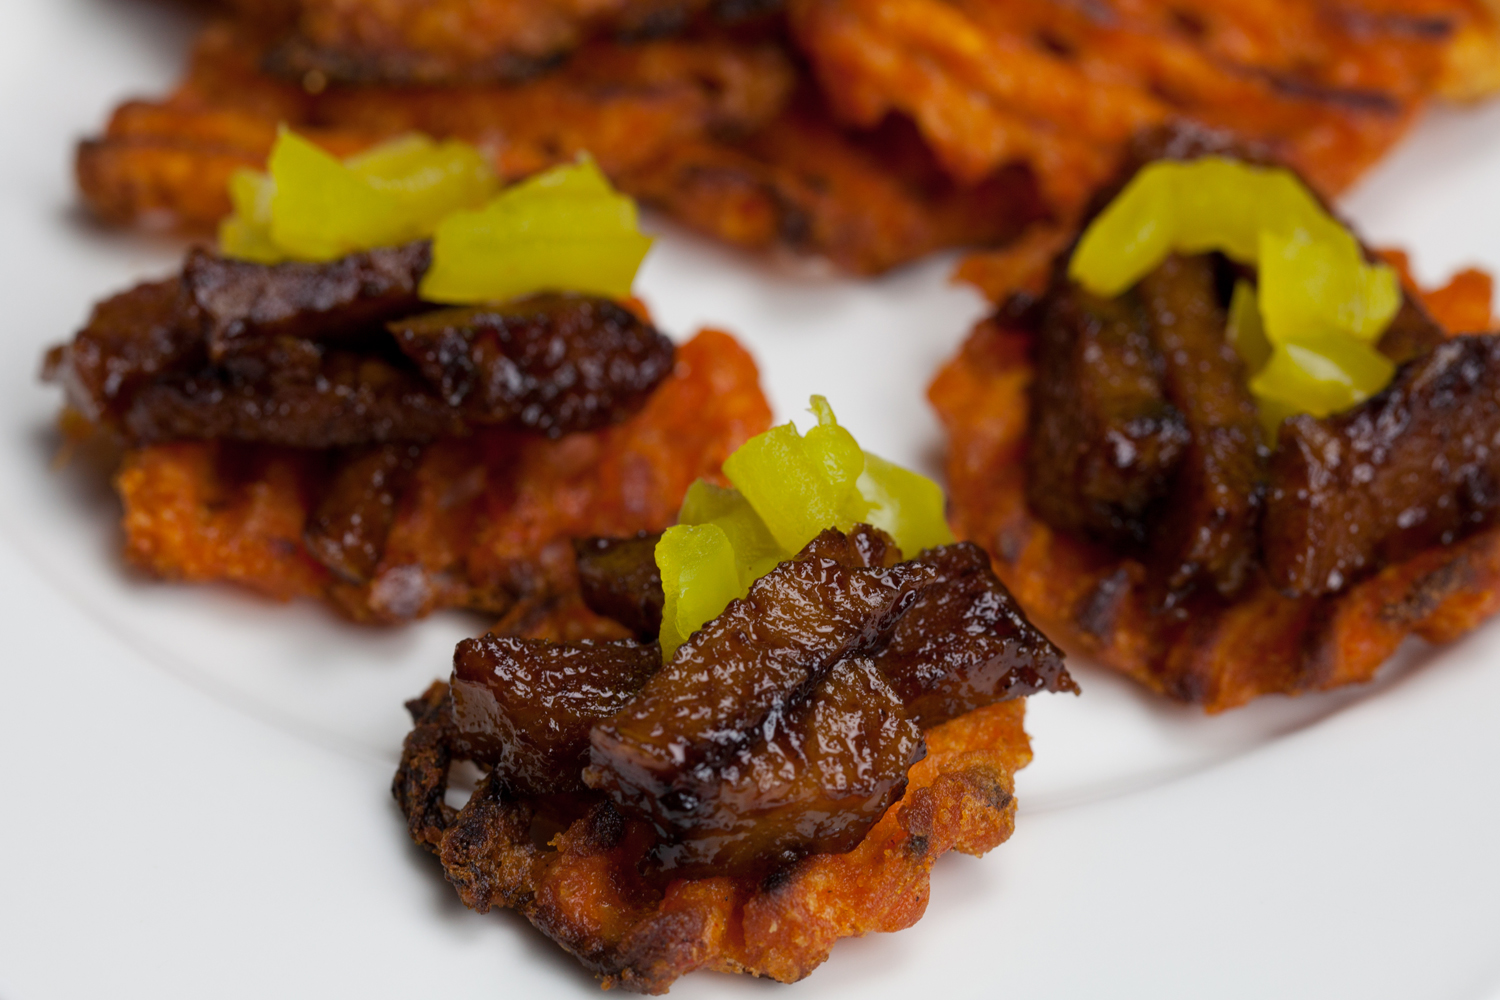
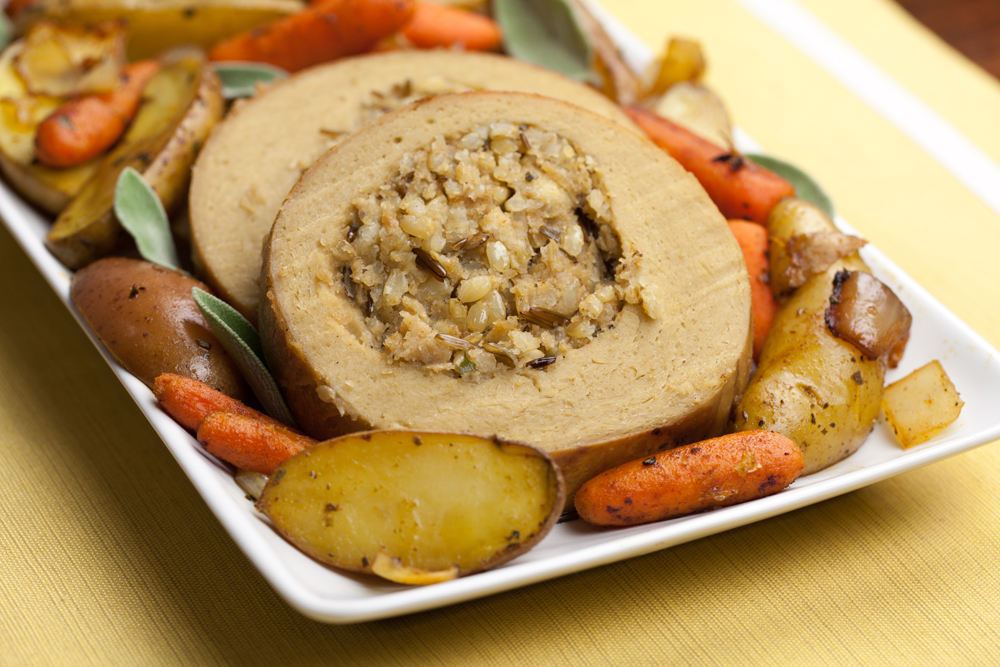
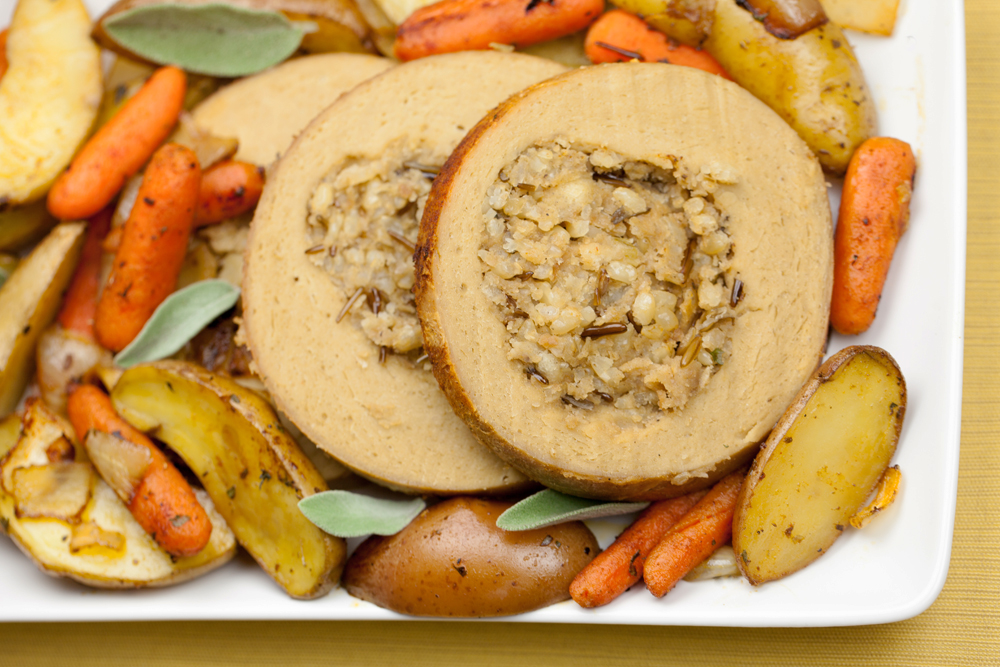
 Here’s the actual star of the show… The Tofurky Roast! I simply followed the package instructions which directed me to back the roast along with onions, potatoes and carrots. No, they weren’t part of my mystery box but I wanted to show how it might look when you serve it up at your Gentle Thanksgiving! I really enjoyed the roast. It was flavorful and juicy- and it would be really easy to add additional spices if the flavor isn’t exactly what you’re looking for. It comes filled with a wild rice stuffing, but IMO you’re going to want to cook additional stuffing on the side, because stuffing is the bomb and one can never get enough of it. “One” being me, of course.

Tofurky 20th Anniversary | www.thatwasvegan.com

Tofurky 20th Anniversary | www.thatwasvegan.com

Whew, that was a long post! And now that my work is done, yours is just beginning. Please go follow Tofurky on Pinterest and repin all your favorite recipes. Tons of great stuff there for your upcoming holiday meals, plus you’re helping animals and humans at the same time. It truly doesn’t get any easier than that. Peace, love and Tofurky!

 *Tofurky sponsored this post, but the opinions are 100% mine!


Pan-Fried Polenta with Fresh Sage
Serves 6
A side dish you can eat with your hands? Yes please!
Write a review
Print
Prep Time
5 min
Cook Time
40 min
Total Time
45 min
Prep Time
5 min
Cook Time
40 min
Total Time
45 min
Ingredients
  1. 5 cups water
  2. 2.5 teaspoons salt
  3. 1 1/4 cups corn grits (I used Bob's Red Mill "Corn Grits/Polenta")
  4. 12 good sized fresh sage leaves, diced
  5. Non-stick spray
  6. Vegan butter for frying
  7. Salt & pepper
Instructions
  1. Bring water and salt to a boil in a large non-stick stock pot (you want high sides to help with splatter). Slowly pour in the grits while whisking constantly. Continue to whisk for about 2 minutes until it begins to thicken.
  2. Reduce heat to low/medium and allow to simmer, stirring with a rubber spatula so you can scrape the sides every minute or so. Add the sage after 15 minutes. After 20-25 (total) minutes it'll begin to pull away from the sides and you'll know it's done.
  3. Spray a 7x11 pan with non-stick spray and pour in the polenta/sage mixture. Refrigerate for at least 2 hours.
  4. Slice the polenta in half crossways, then into 24 "fingers". Melt ~2 tablespoons vegan butter in a frying pan over medium heat. When it's sizzling, drop in the polenta sticks. Fry until brown on both sides (flipping each once), adding S&P as you go. You'll most likely want to add a little extra salt at the end. Serve hot!
Adapted from Williams Sonoma
That Was Vegan? https://www.thatwasvegan.com/

Massaged Kale Salad with Maple-Roasted Pumpkin
Serves 5
A delicious way to combine sweet and healthy!
Write a review
Print
Prep Time
20 min
Cook Time
15 min
Total Time
35 min
Prep Time
20 min
Cook Time
15 min
Total Time
35 min
Ingredients
  1. 1 small pumpkin, cut into bite-sized cubes (about 2 cups)
  2. 1 small white onion, diced
  3. 1 tablespoon butter-infused olive oil
  4. 2 tablespoons maple syrup (the REAL kind!), plus 1 tablespoon
  5. S&P
  6. 1 large bunch kale
  7. 1 tablespoon regular EVOO
  8. 2 tablespoons fresh squeezed orange juice
  9. Handful sliced almonds
Instructions
  1. Preheat oven to 375.
  2. Combine the butter-infused olive oil, 2 tablespoons maple syrup and pinch of S&P in a medium bowl. Add the pumpkin and onion, stirring to coat, then place in a single layer on a baking sheet. Bake for 15 minutes, stirring once. When it comes out, but before you mix with the salad, taste-test and add more salt if needed.
  3. De-stem and chop the kale and place in a large mixing bowl. Top with the regular EVOO, orange juice, and the 1 tablespoon of maple syrup, then begin to massage with your hands. Once all the leaves are coated, set aside and allow to sit at room temp for at least 30 minutes. About 5-10 minutes before you're ready to serve, mix in the pumpkin and onion mix, along with the almonds, stirring well. Taste and add salt to taste. Serve at room temperature.
Notes
  1. If you don't have butter-infused olive oil, you could just mix half regular olive oil and have melted vegan butter. I really do suggest you pop into one of those olive oil stores and pick some up though- it's completely plant based and AMAZING!
That Was Vegan? https://www.thatwasvegan.com/
{ 6 comments }

The Best Mexican-Layer Dip

The Best Mexican Layer Dip | www.thatwasvegan.com

There are many recipes out there for Mexican Layered Dip. Even for Vegan Mexican Layered Dip. But this one is mine, and it is the best. The. Best.

In my opinion anyway.

Okay, a little back story. A girl I knew in high school taught me this recipe. I think she learned it in home ec class, which apparently used to (?) be a thing. Not that I would know, I took French for my elective.  Je suis Barbara. J’adore les légumes!

This would’ve been like 1993 or so which means I’ve remembered and continued to make this for more than 20 years. Pretty sure this holds the record for longest running dish!

Not that it’s all that complicated of course. Basically it’s:

The Best Mexican Layer Dip | www.thatwasvegan.com

There are layers of cream cheese, taco flavored beefy crumble, tomatoes, Daiya cheese, and salsa. This time around I used homemade salsa full of backyard tomatoes and fresh jalapenos. It was meant to be for snacking one Sunday afternoon while watching the Patriots (or was it the Broncos? I’m such a fickle football fan) but it quickly became dinner.

The Best Mexican Layer Dip | www.thatwasvegan.com

Make it the next time your team plays. Or the next time you snuggle up on the couch to watch Love, Actually. No judgment here! Oh, and speaking of which… am I the only person who never realized that Rick from The Walking Dead is the guy who secretly loves Kiera Knightly in that flick?

I am? Figures…

The Best Mexican Layer Dip | www.thatwasvegan.com

There are lots of other delicious things you could add to the tomato layer too:

  • Diced jalapenos
  • Green chilies
  • Black beans
  • Black olives
  • Chopped red onion

Yum!


The Best Mexican-Layer Dip
There are plenty of layered dip recipes out there... but this one is The. Best.
Write a review
Print
Ingredients
  1. 2 loaves homemade seitan OR ~10oz beefy crumbles like Beyond Beef Fiesty Crumbles
  2. Touch of non-stick oil
  3. 1 tablespoon taco seasoning
  4. 8oz vegan cream cheese (not a sweetened one like Daiya tho)
  5. 1 large tomato, diced
  6. 1/2 - 1 cup Daiya cheddar shreds
  7. 1 cup salsa
Instructions
  1. If using homemade seitan, chop the loaves and pulse them in the food processor until crumbled. Heat in frying pan over medium with spray and the taco seasoning. Set aside.
  2. Spread the cream cheese over the bottom of a 7" baking dish. Top with the seitan crumbles, then the diced tomatoes, then the cheese. Bake at 350 for about 10 minutes until heated through and the cheese is melty. Remove and top with the salsa and serve with salty chips!
Notes
  1. If you're using Fiesty Crumbles, SKIP the taco seasoning- they're already plenty flavorful! Also, if you're using a liquidy salsa, drain the extra juice before adding it to the pan.
  2. See the post for other add-in ideas!
That Was Vegan? https://www.thatwasvegan.com/
{ 5 comments }

Sweet n’ Tangy Cranberry Tofu

Sweet n' Tangy Cranberry Tofu | www.thatwasvegan.com

I realize that for most people this time of year can be summed up in one main ingredient… pumpkin. And yes, I get it. When the weather begins to turn colder I definitely enjoy experimenting with pumpkin. But even more than pumpkin, this time of year (September through New Years, I suppose) makes me crave CRANBERRIES! They are my ultimate fall/winter ingredient, which is why I’m so excited to finally share this recipe for Vegan Sweet n’ Tangy Cranberry Tofu! Now that it’s November, it seems fitting.

This is a recipe I’ve loved since my pregan days, although I have to admit I didn’t always make it with tofu. But as it turns out, it’s GREAT with tofu, and also with seitan!

Such a pretty dish, if I do say so myself!

Sweet n' Tangy Cranberry Tofu | www.thatwasvegan.com

I no longer have the original recipe (it was from that Rachael Ray book with a new recipe for each day of the year… hello pregan cooking!), but that’s no great loss because it was full of ingredients we don’t need and don’t want to use anyway. 

This tofu dish is perfect for your next holiday or autumnal dinner party, and even the omnivores will be exclaiming over how flavorful and delicious it is! I paired it with steamed broccoli and fingerling potatoes, which I think went perfectly. A very filling yet healthy and delicious meal!

Sweet n' Tangy Cranberry Tofu | www.thatwasvegan.com


Sweet n' Tangy Cranberry Tofu
Serves 4
This might be the best holiday-season meal ever!
Write a review
Print
Prep Time
10 min
Cook Time
40 min
Total Time
50 min
Prep Time
10 min
Cook Time
40 min
Total Time
50 min
Ingredients
  1. I block firm tofu, well pressed (at least an hour)
  2. Extra virgin olive oil
  3. 1 small red onion, diced
  4. 3 stalks celery, diced
  5. 1/2 teaspoon crushed red pepper
  6. 1/4 teaspoon cinnamon
  7. 1/2 cup red wine (I've used white wine before too, and it was delicious, so just go with your personal preference or what you have on hand!)
  8. 1 cup dried cranberries
Instructions
  1. Preheat the oven to 385. Press the tofu REALLY well, then slice into 14 thin rectangles. Spray baking sheet with non-stick spray and arrange tofu in single layer. Give a pinch of salt and pepper and bake for about 15 minutes on each side.
  2. Saute the onion and celery in the oil over medium heat for 3-4 minutes, sprinkling in the crushed red pepper and cinnamon about halfway through.
  3. Add the wine and cranberries and reduce to low. Simmer until the pan is mostly dry. When the tofu is done baking add it to the pan as well so it can soak up some of these delicious flavors!
  4. The dish is ready when you like the consistency of the cranberry mix. Use it to top the tofu and serve hot!
Adapted from Rachael Ray
That Was Vegan? https://www.thatwasvegan.com/
{ 2 comments }

Tuno Salad: The Reboot

Every now and then I get a little bit lonely and you’re never comin’ round make an old recipe and take a (much) better picture, and just have to share it and update the old post. This is one of those times.

Tuno Salad | www.thatwasvegan.com

I know there are a lot of recipes out there for chickpea salad, but I’m absolutely in love with this one. It’s great on sandwiches or crackers. Or just a spoon! So the next time you’re looking for a quick and easy (and delicious!) lunch, check out my Tuno Salad!

Pssst! It’s also great as a Tuno Melt or for Stuffed Tomatoes!

Related Posts Plugin for WordPress, Blogger...
{ 1 comment }
Social media & sharing icons powered by UltimatelySocial